[Gaming NB/DT] Aura Relative Introduction
Aura Creator Introduction
Aura Wallpaper Introduction
Aura Wallpaper Creator Introduction
Aura Creator Introduction
Contents
AURA Creator Introduction
Model Supported
Application Install& Uninstall
Launching AURA Creator
Main Features
Q&A
1. AURA Creator Introduction
AURA Creator is an advanced lighting-editing application that allows users to compose their own lighting effects/patterns for their ROG machines. This article provides a brief introduction of how each area of the application can be utilized.
*The content of this article is applicable to AURA Creator V2.0.3 and above.
2. Model Supported
AURA Creator has been integrated into the Armoury Crate application. Users can configure the settings through the Armoury Crate application.
Please make sure the Armoury Crate version is V3.0.4 or above.
For more details about supported models, please refer to link. *Devices listed are updated from time to time.
3. Application Install& Uninstall
How to get and install the application program,please refer to Here.
How to uninstall application program,please refer to Here.
4. Launching AURA Creator
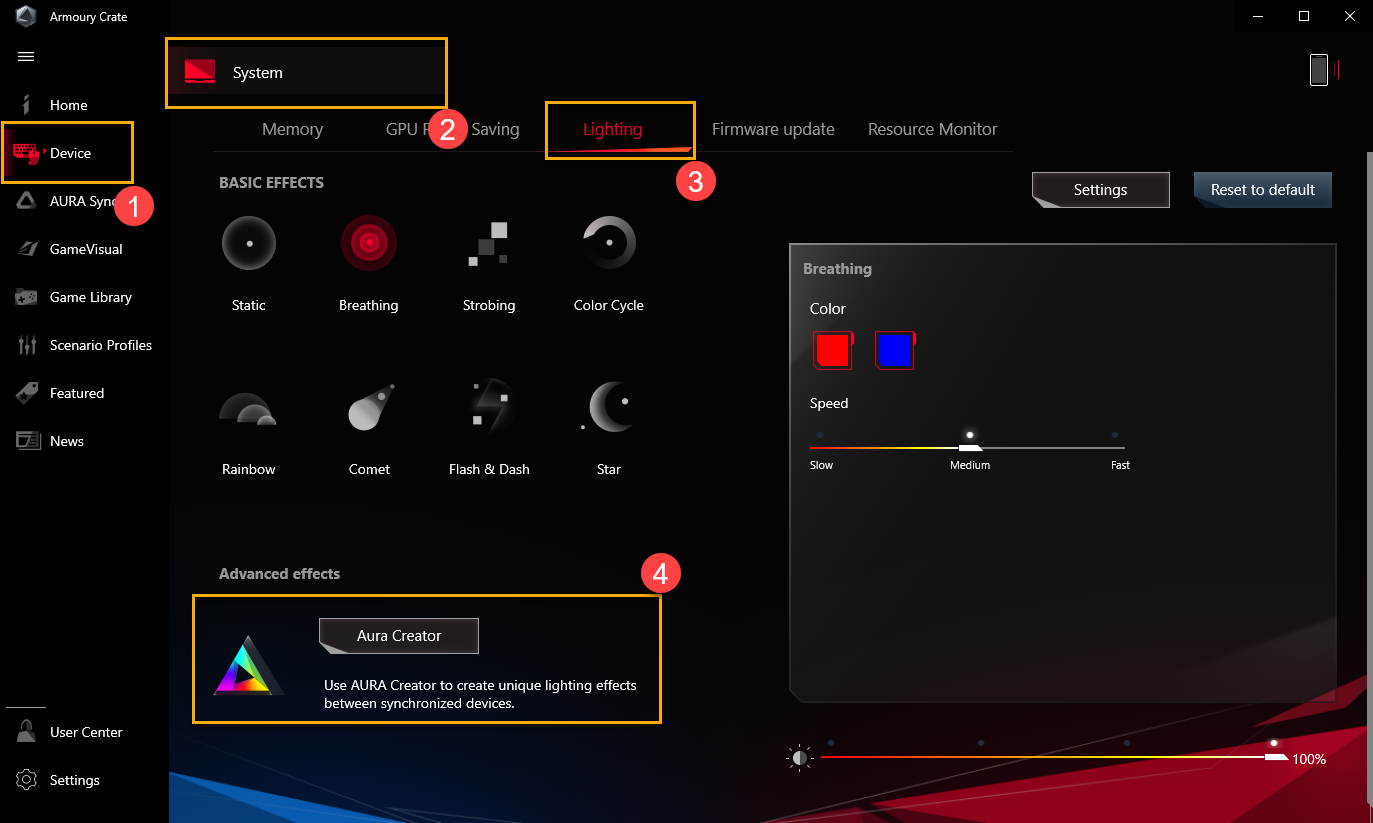
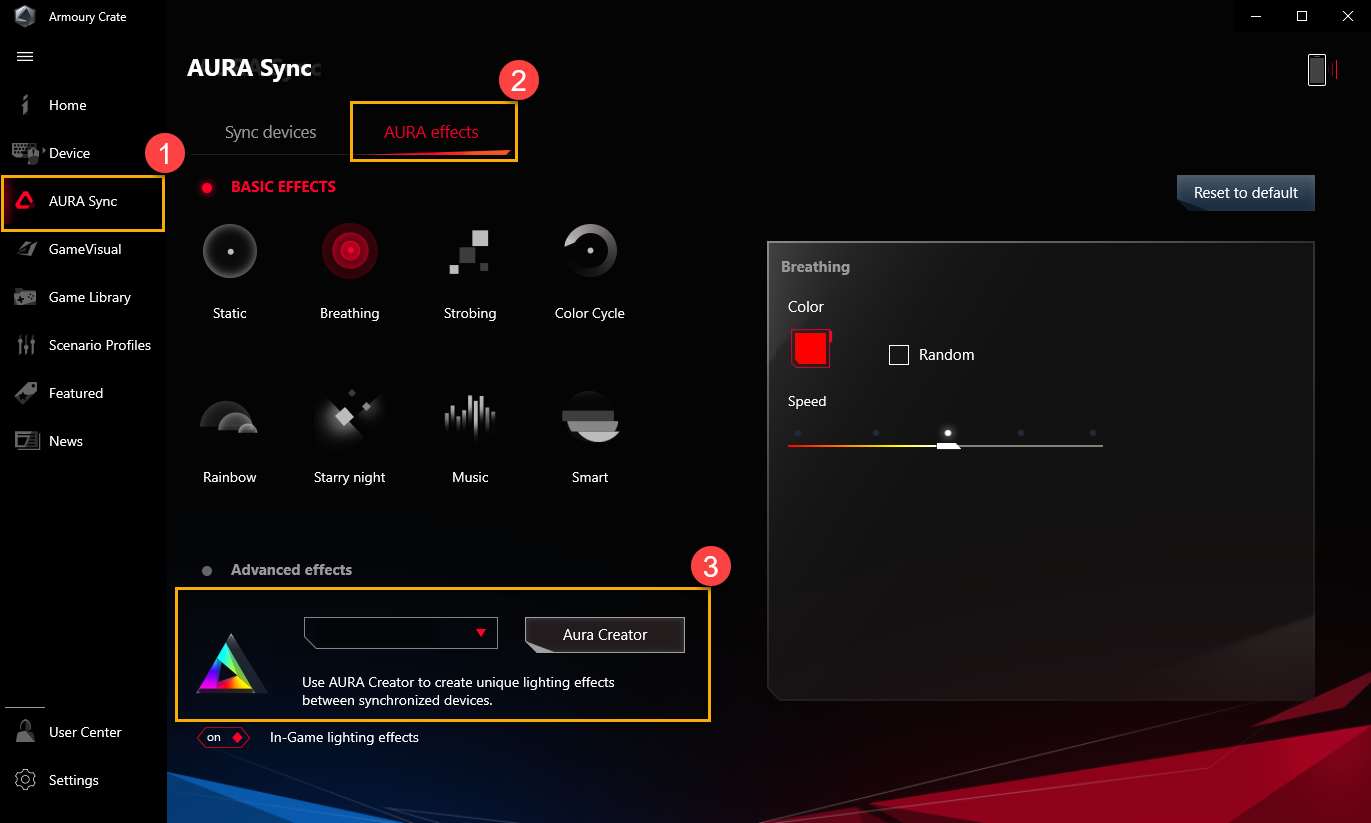
There are two ways to launch AURA Creator,
※In Armoury Crate application, select "System"② in main menu "Device"① item, and then click "Lighting"③ page. After that, to click "Aura Creator"④ icon to launch Aura Creator.
※In Armoury Crate application, select "AURA Sync"① in main menu and get in to "AURA Effects"② page, after that clicking "Aura Creator" ③ to launch.
Back to Contents
5. Main Features
※AURA Creator Home Page: (A)System/ Device Arrangement、(B)Layer Arrangement and Timeline Editing、(C)Lighting Effects、and (D)Lighting Effect Properties
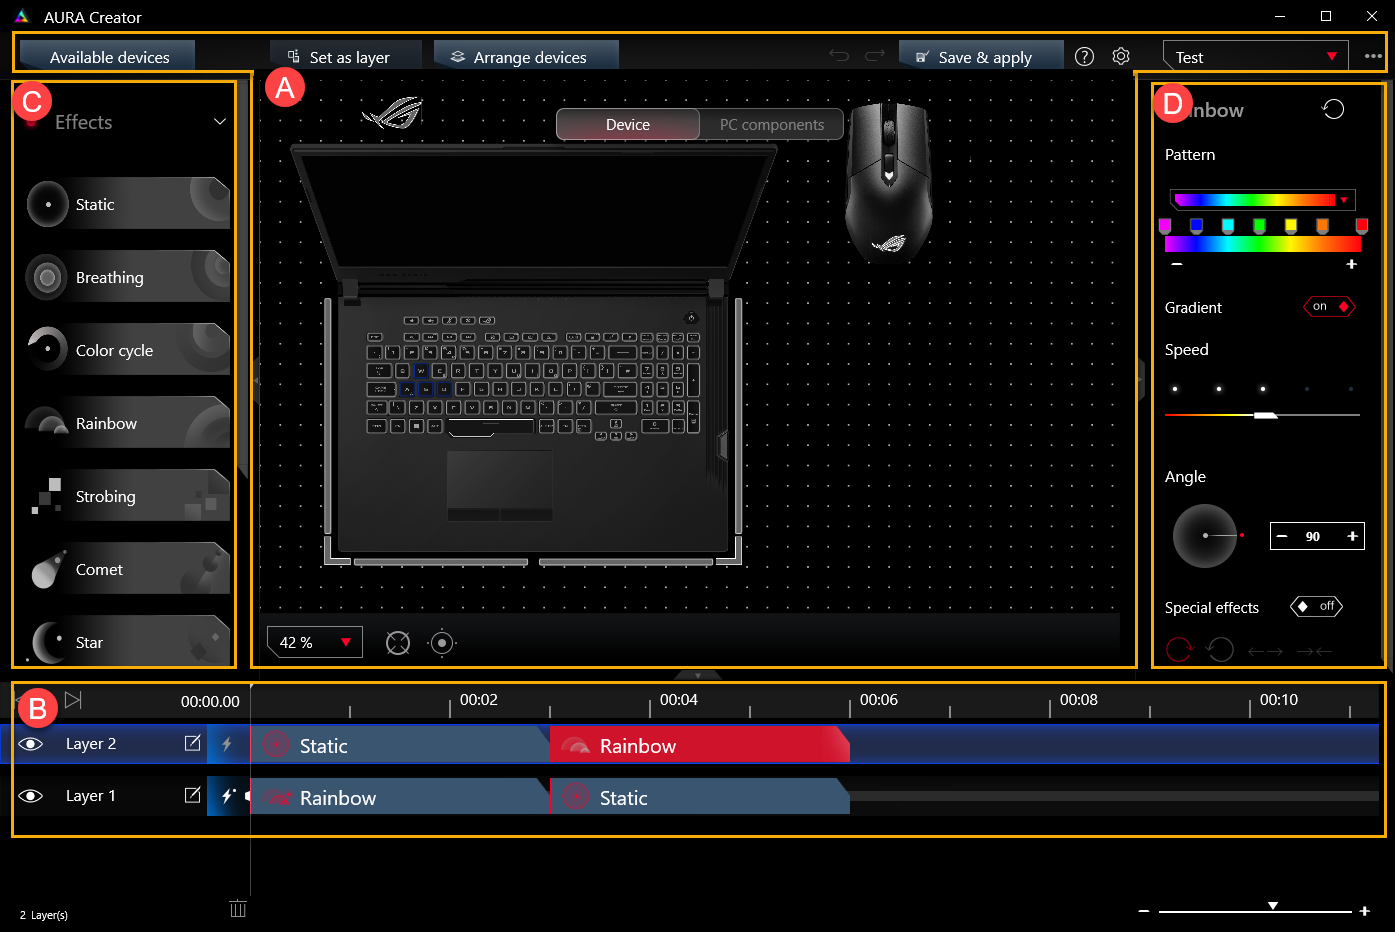
(A) System/ Device Arrangement
Utility automatically detects the compatible devices connected and allows you to place your devices according to actual arrangement.
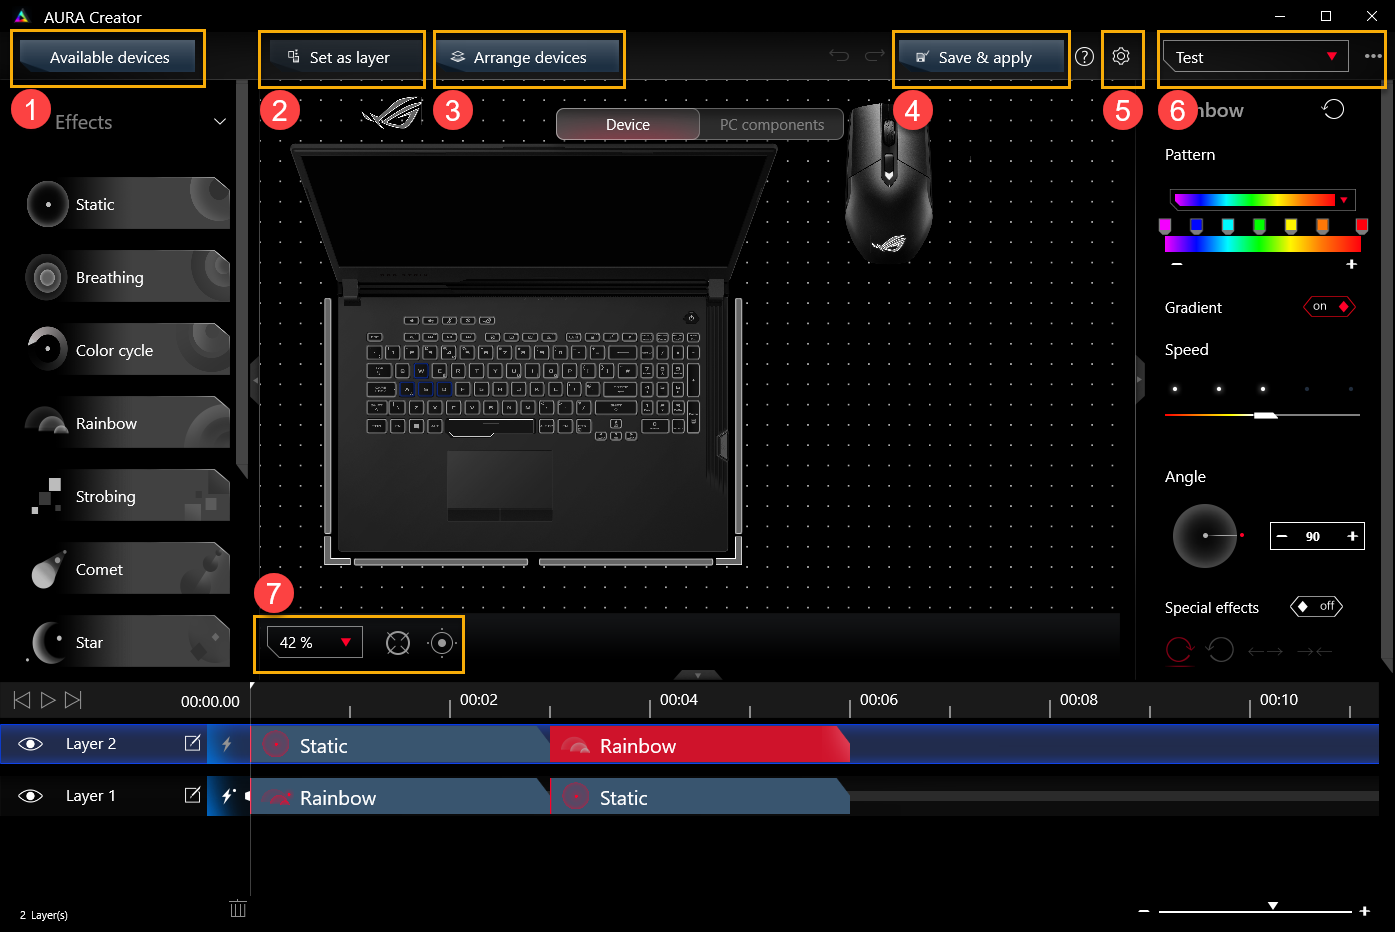
Available devices①: To select and sync device which would like to edit AURA lighting effect.
Set as layer②: To click or drag select lighting zones from the device display and set as a layer.
Arrange devices③: To click rearrange the layout of your available devices.
Save & apply④: To save and apply your current light effect editing on the device.
Settings⑤: To provide AURA Creator current version、 Tutorial、 Shortcuts, and check update.
Lighting profile⑥: Gamers can Rename、Delete、Create new、Import and Export the profiles.
Reset layout/ Fill editing area⑦: To adjust the layout ratio, and reset or fill editing area.
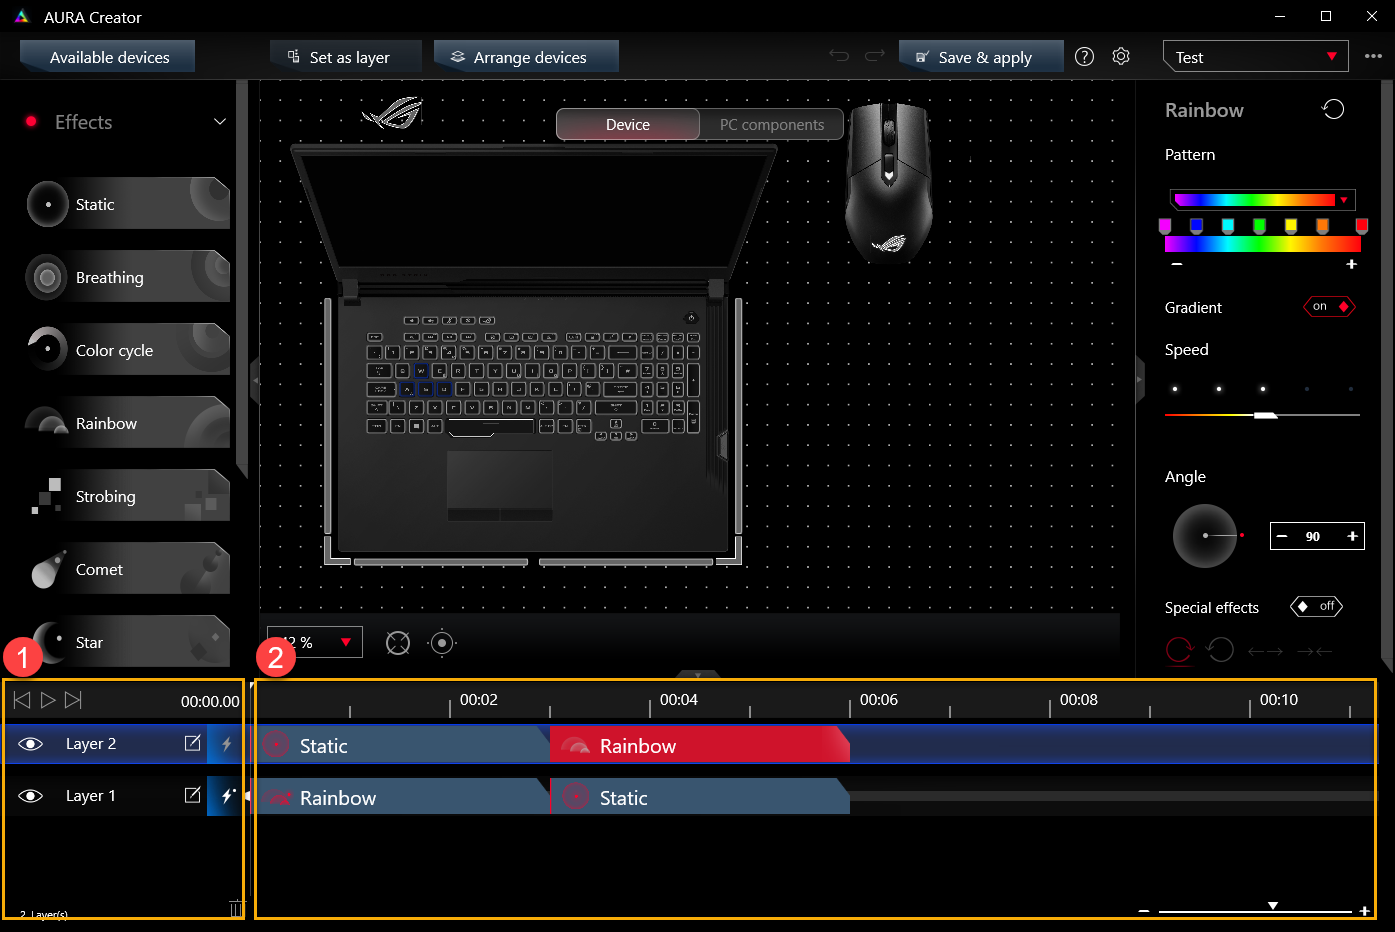
(B)Layer Arrangement and Timeline Editing
Layer arrangement①: Gamers can edit the layer lighting effects、rename layer and preview the lighting effects.
Timeline editing②: Gamers can drag lighting effect bricks to the timeline, and adjust the start time and duration time for lighting effects.
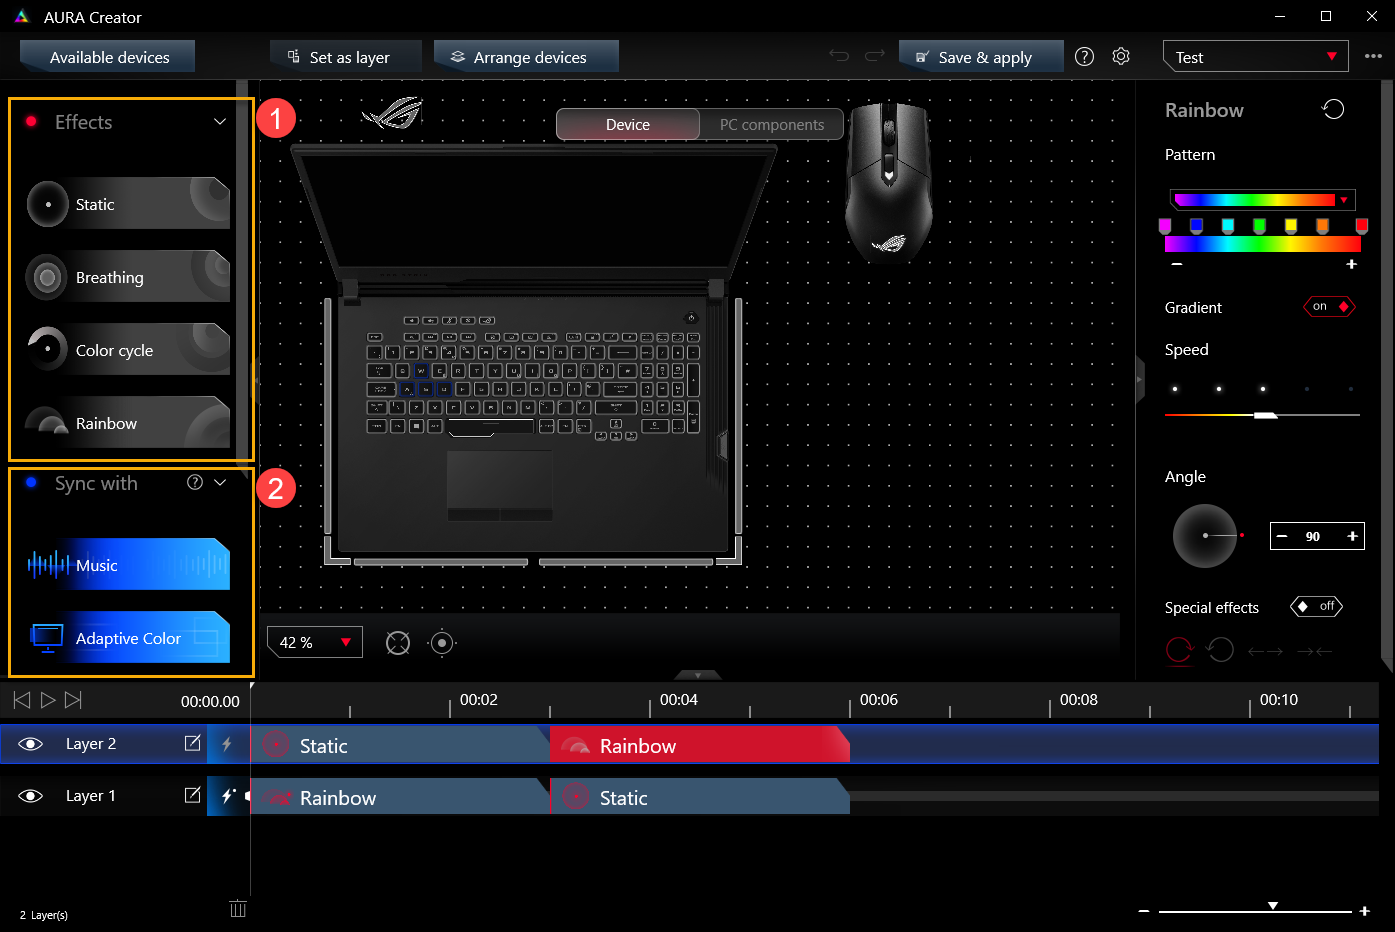
(C)Lighting Effects
Lighting effects①: To provide variety of lighting effect. Gamers can simply select and drag lighting effect bricks to the timeline.
Sync with②: To sync the lighting effect with a selected source.
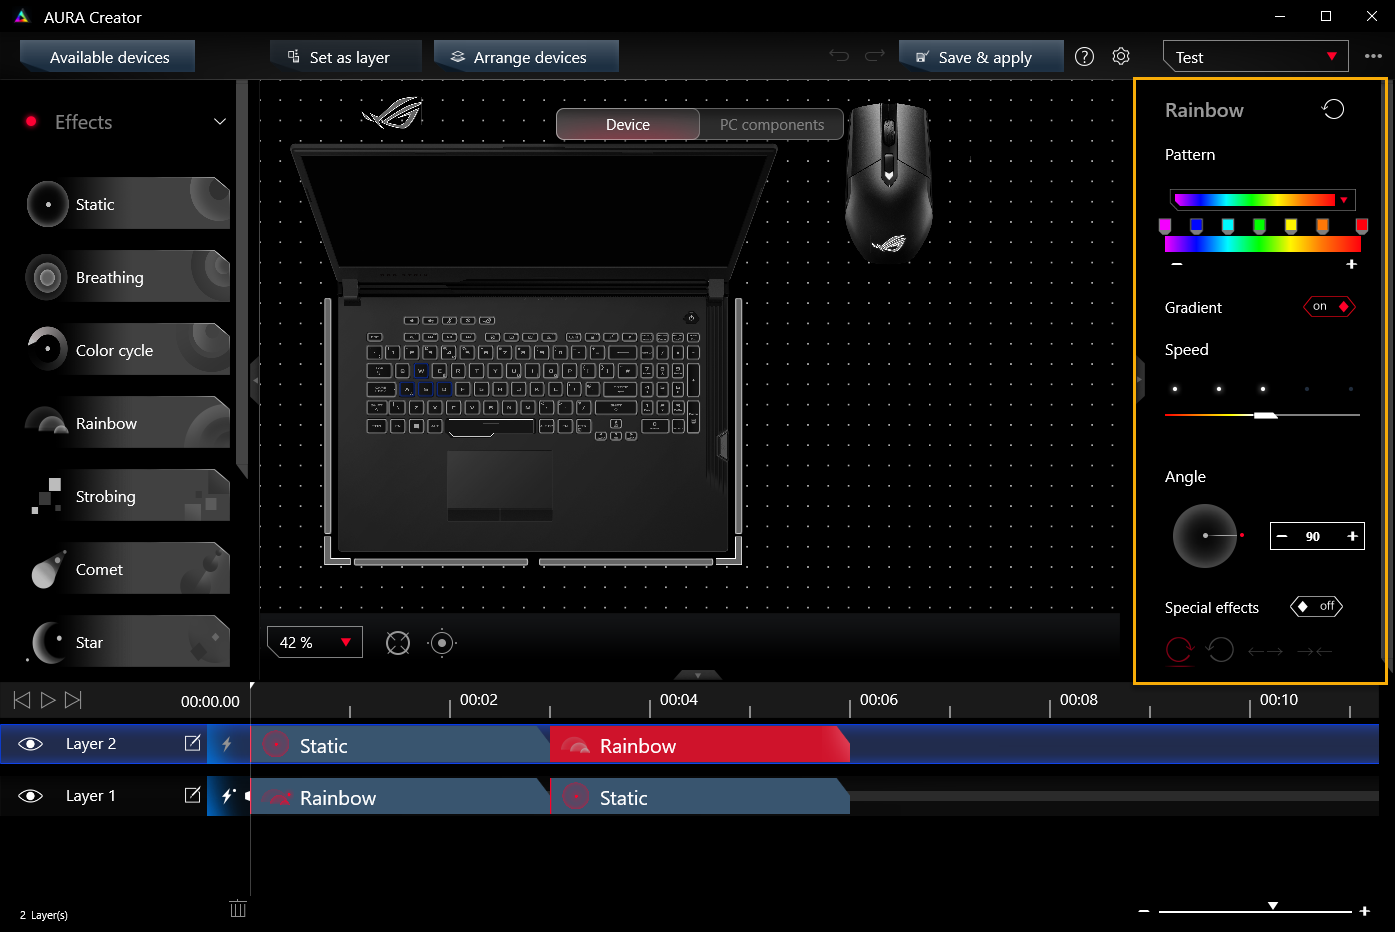
(D) Lighting Effect Properties
A variety of lighting effect properties are available. Color, brightness, speed, or angle of each effect brick can be independently adjusted.
Back to Contents
6. Q&A
Q1: Can AURA Creator work on TUF Notebook Gaming models?
A1: No, Aura Creator does not work on TUF series Gaming Notebook models.
For a list of the latest supported devices, please check the support list on the AURA Creator website.
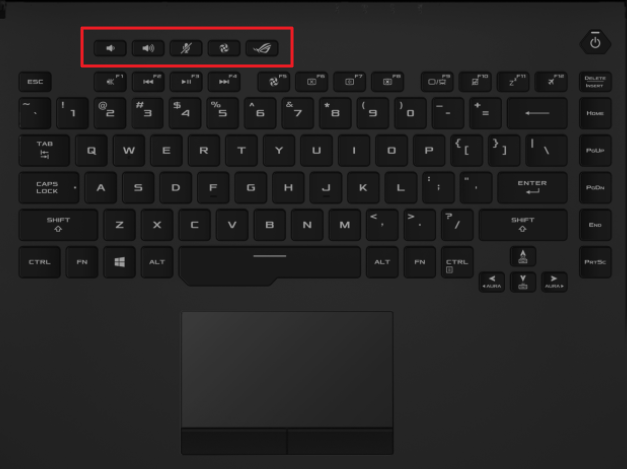
Q2: Why my laptop independent hotkey is unable to support AURA Trigger Effects (Reactive/Laser/Ripple) function?
A2: The AURA Trigger Effects can only support Per-Key RGB backlight keyboard and laptop, but not include laptop independent hotkey. (Only few models support hotkey with AURA Trigger Effects)
<Independent hotkey>
Q3: How do we preview the AURA lighting effect after modified?
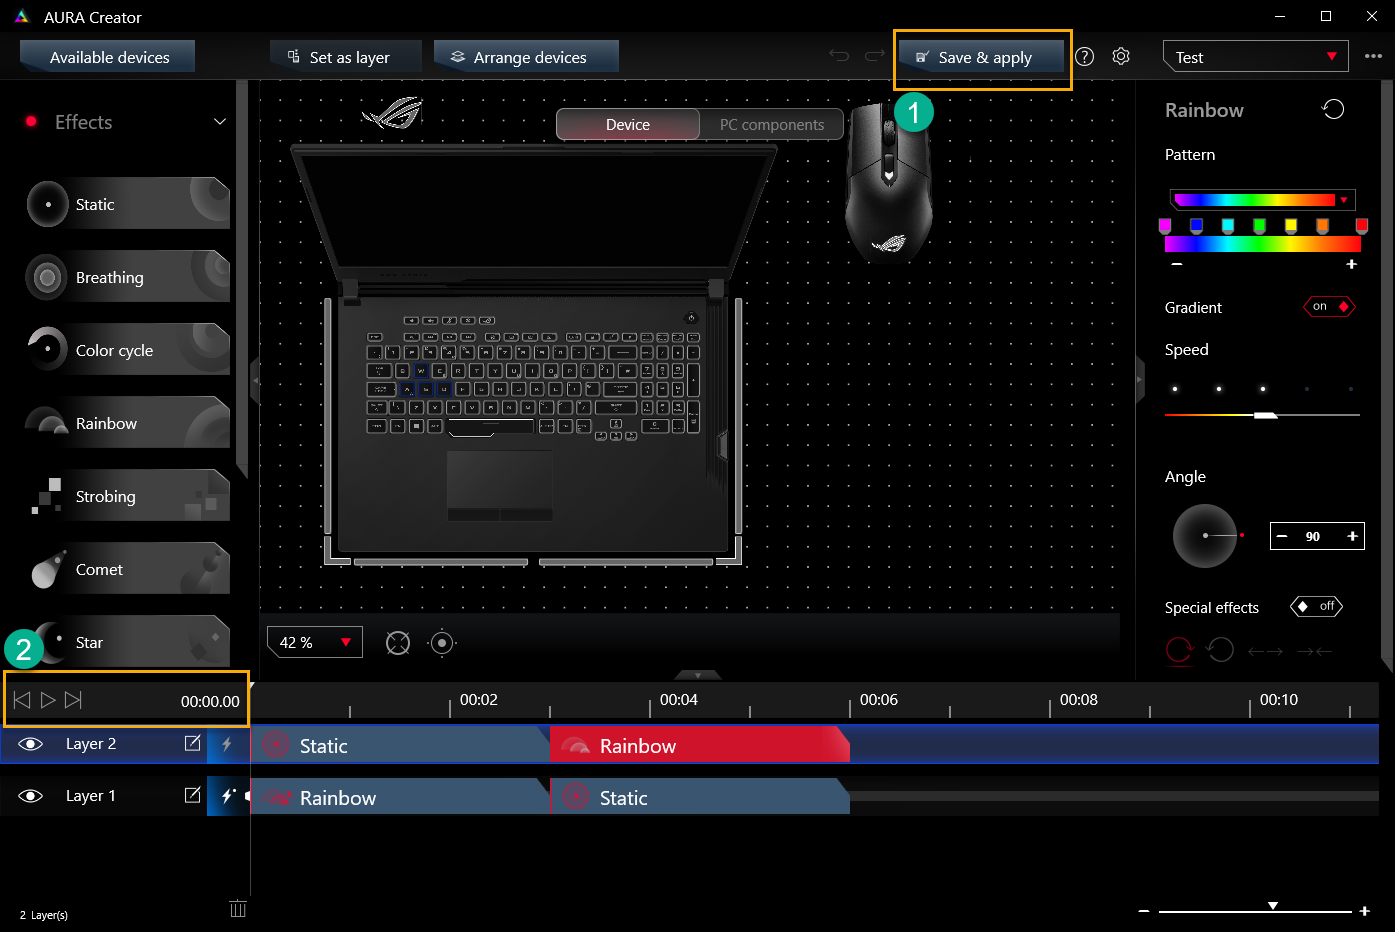
A3: Please click "Save& apply"① to save and apply modified lighting effect. After that, clicking  "Play"② to preview lighting effect.
Q4: How should we select the lighting effect we require?
A4: Apply the effects by simply selecting and dragging them to the timeline.
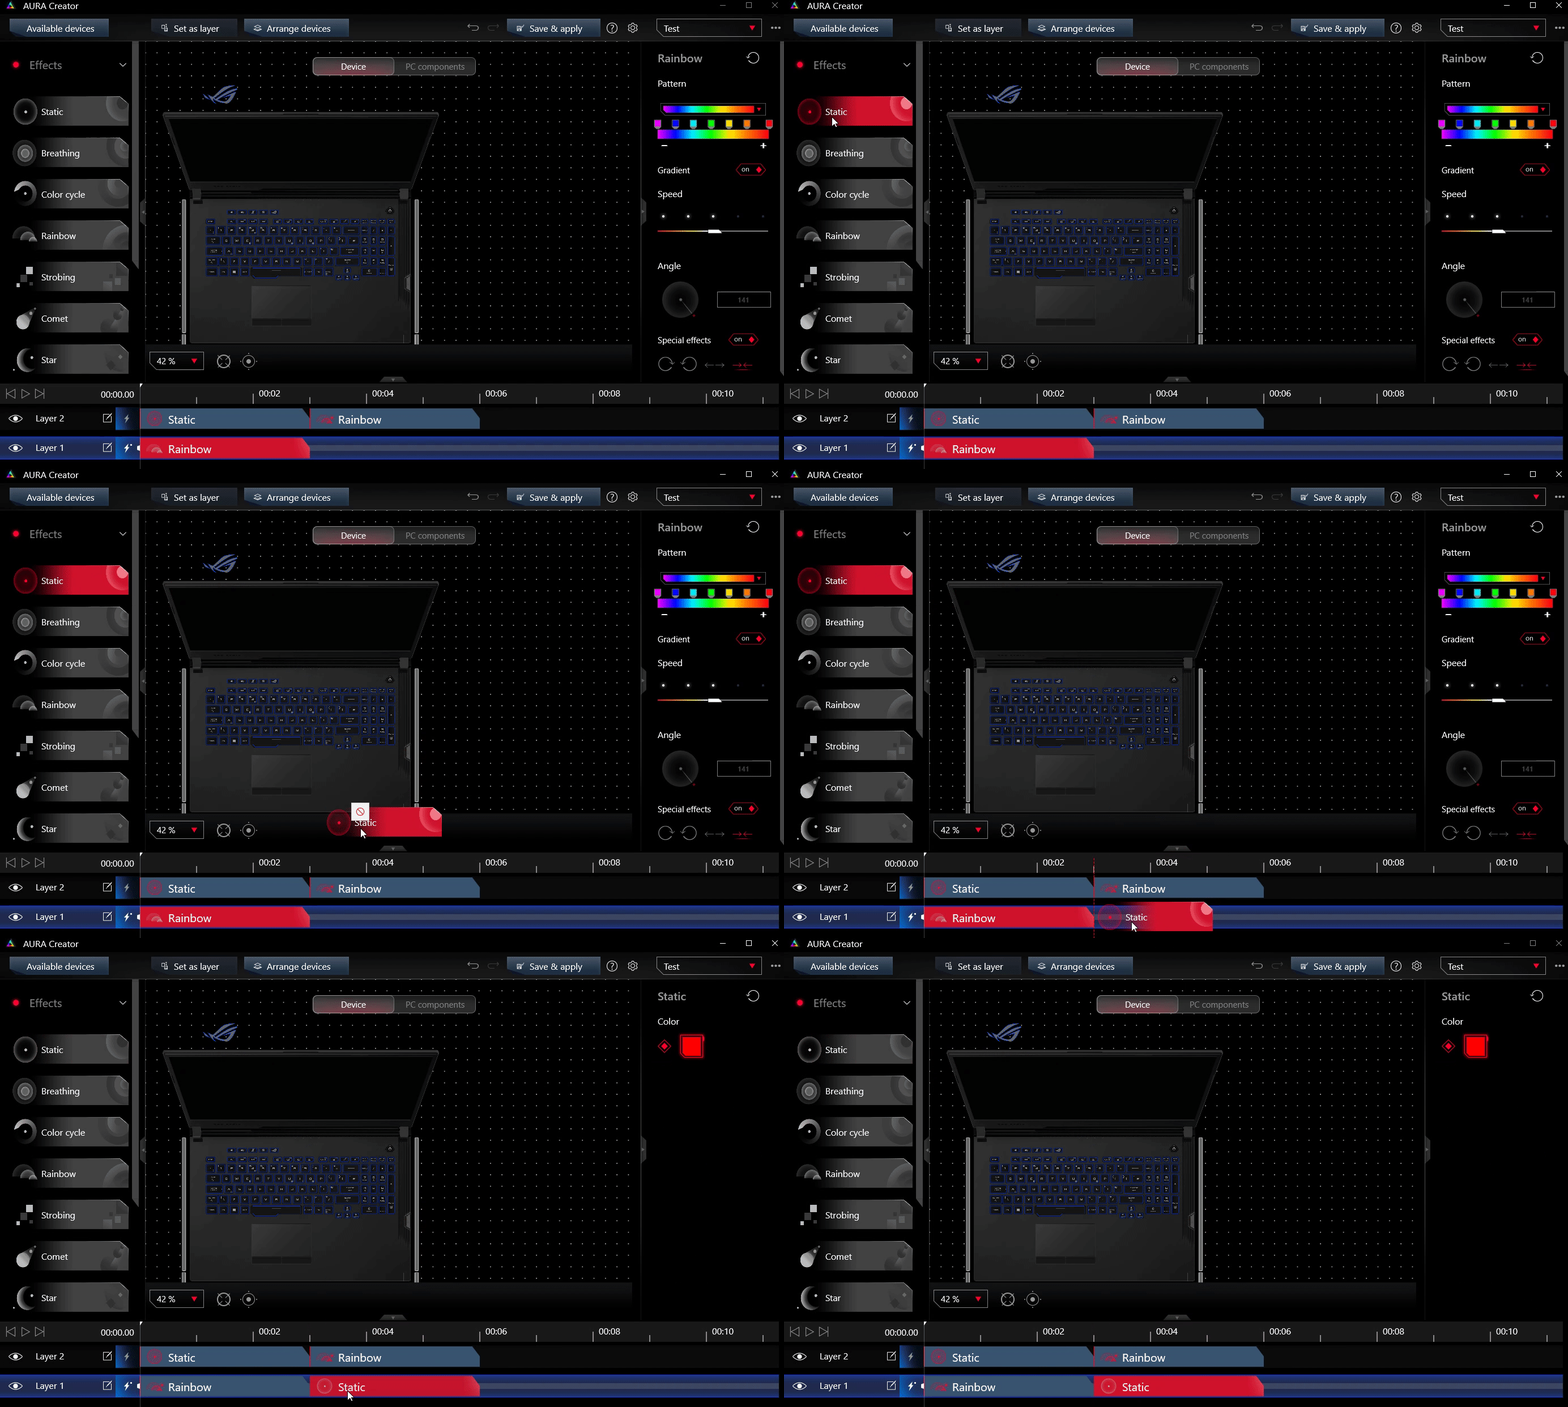
Q5: How can we adjust lighting effect start time and duration time?
A5: Please refer to below actual adjustment method for lighting effect.

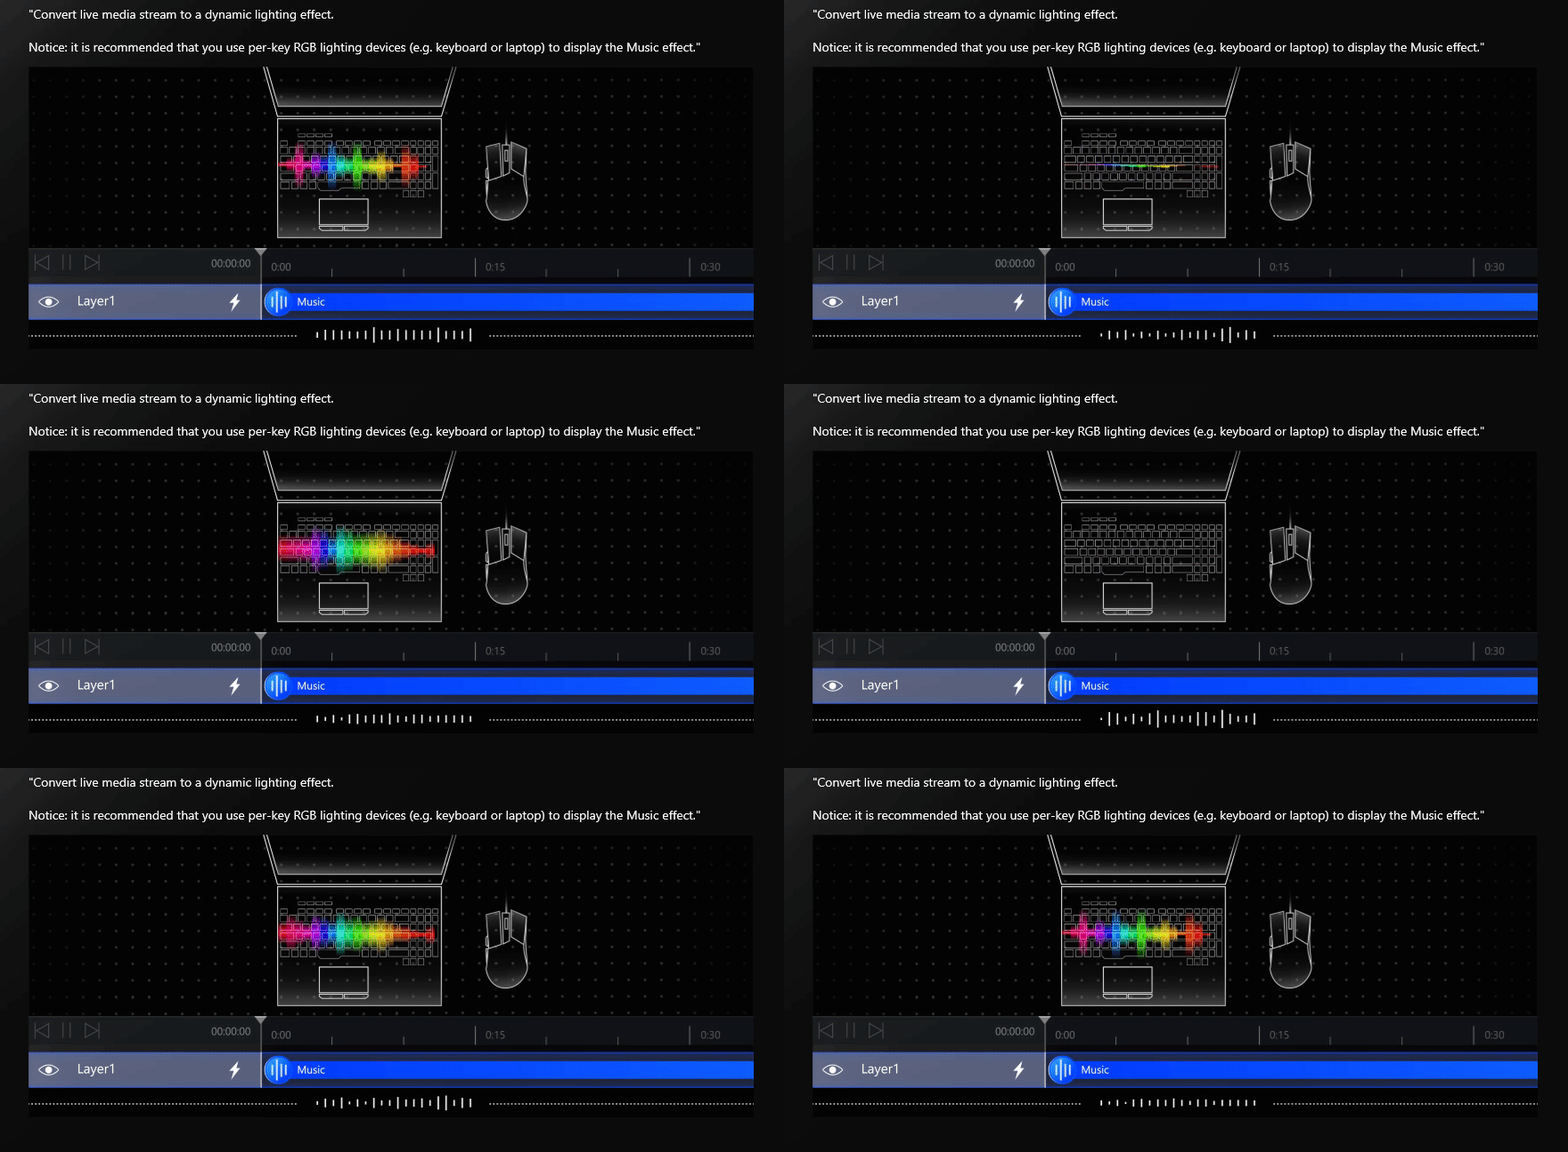
Q6: What is Music and Adaptive Color effect in "Sync With"?
A6: Music Effect: Convert live media stream to a dynamic lighting effect.
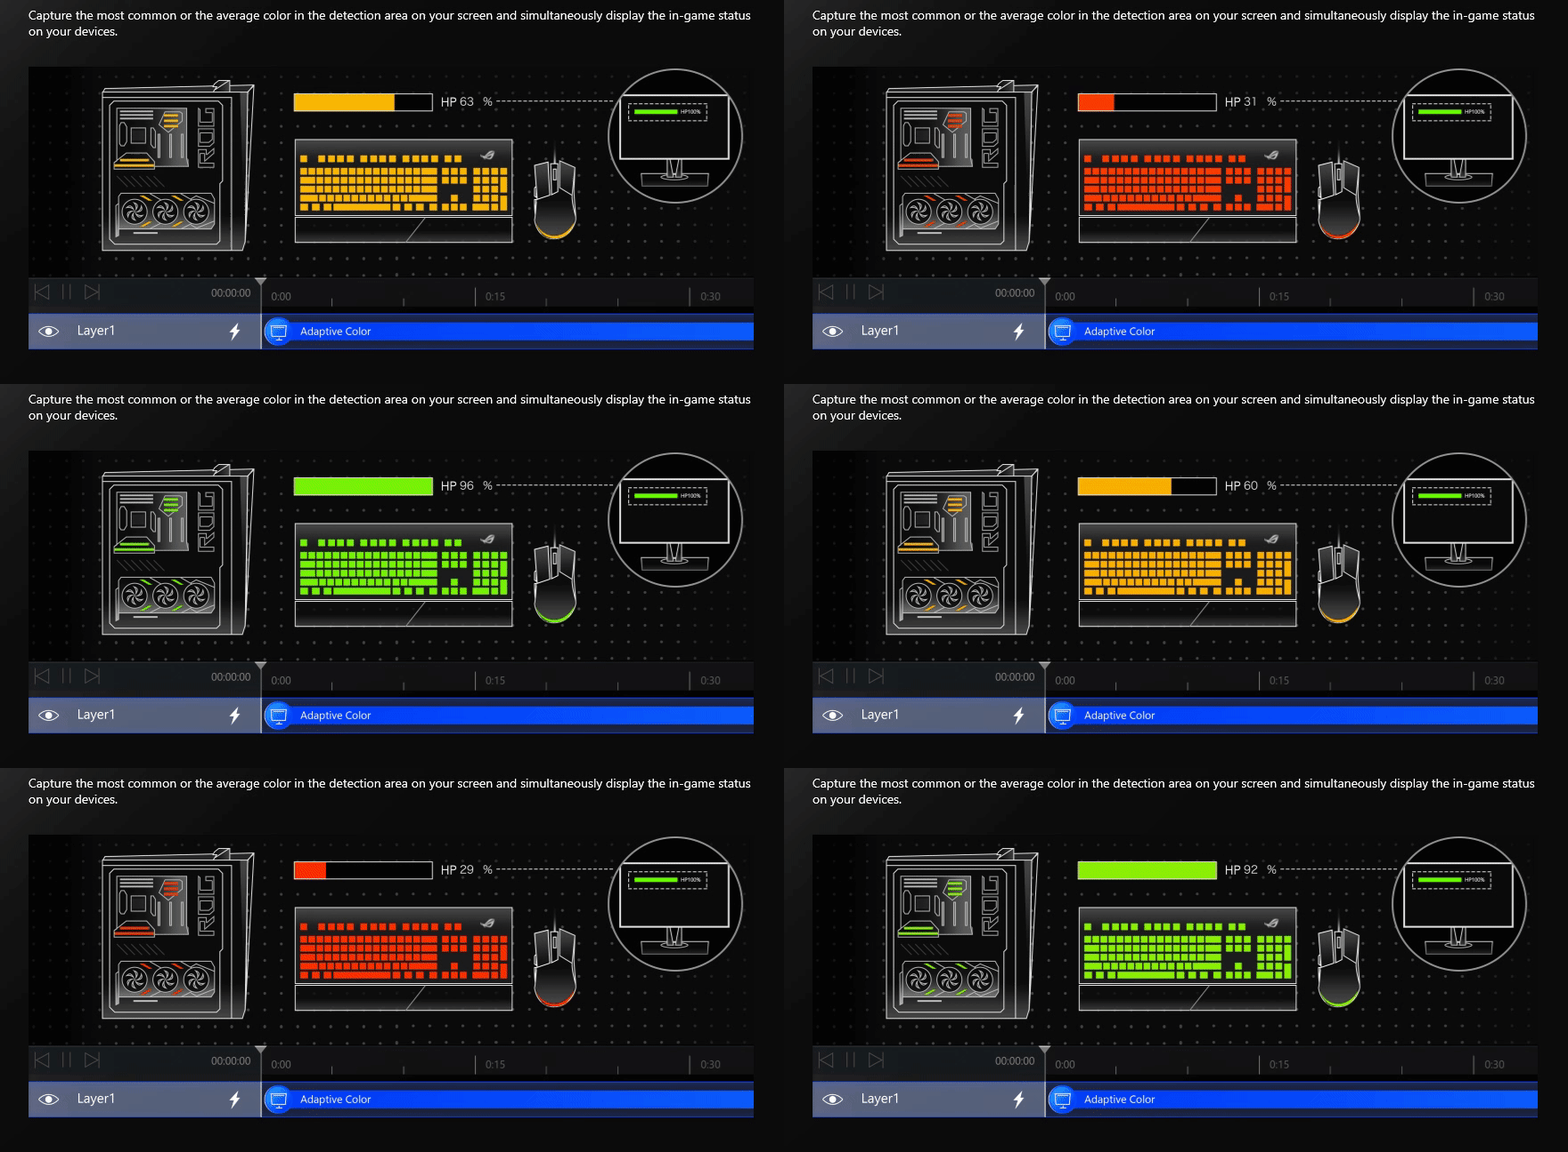
Adaptive Color Effect: Capture the most common or average color in the detection area on your screen currently and simultaneously display the in game status on your devices.
Back to Content
AURA Wallpaper Introduction
Table of Contents
Aura Wallpaper Introduction
Aura Wallpaper is an extension application of the Armoury Crate platform, and turns entire desktop into an RGB device. Aura Wallpaper allows user to set up ROG exclusive wallpaper and select of the RGB lighting on ROG wallpaper, and that can also synchronize the wallpaper with other Aura Sync compatible devices. Through synchronizing Wallpaper、laptop and peripheral devices lighting effect perfectly combined to create a personal gaming style.
Model Supported
Supports ROG and TUF series Gaming laptop and desktop, and require Windows 10 and above operating system version.
System Prerequisites
The Aura Wallpaper has been integrated into the Armoury Crate application. Users need to configure the Aura Wallpaper settings through the Armoury Crate application.
Supported Version: Armoury Crate application version must be higher than V5.0 above.
*Please refer to Link for more details about Armoury Crate Introduction.
Application Install& Uninstall
How to get and install Armoury Crate,please refer to ASUS official website.
How to uninstall Armoury Crate,please refer to ASUS official website.
Launch Aura Wallpaper
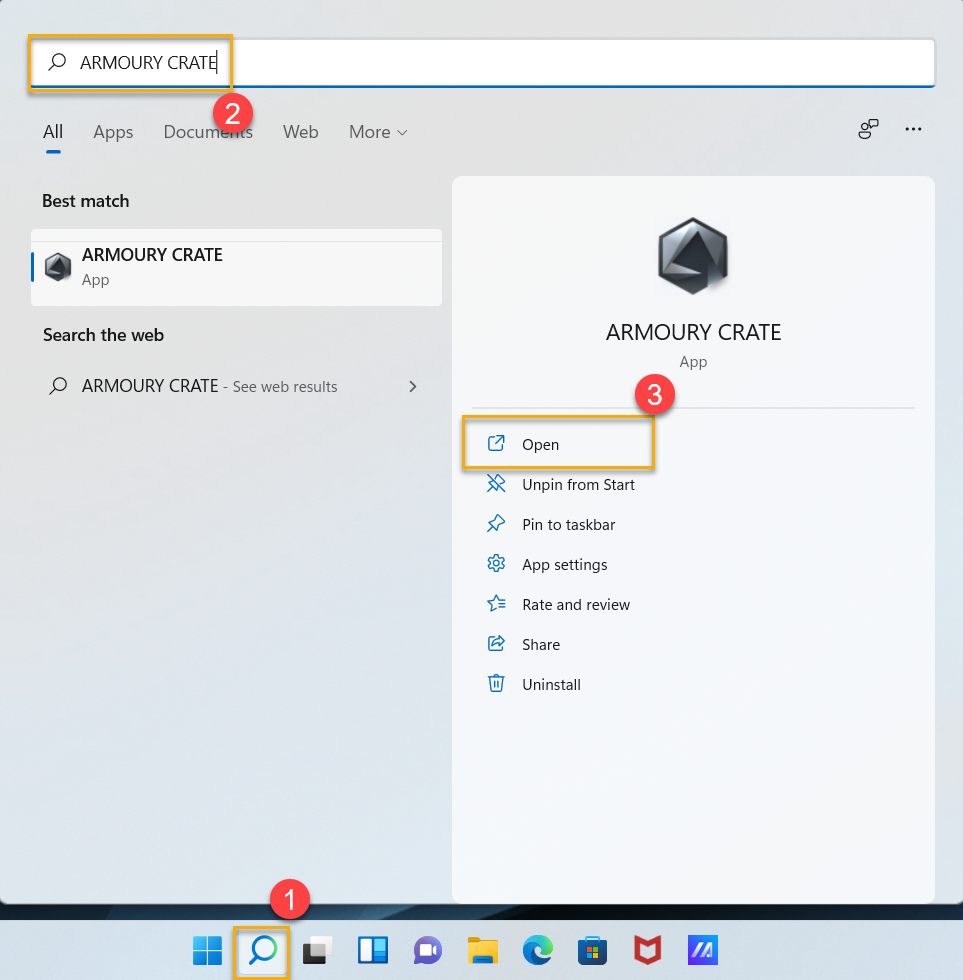
Please click [Windows Search]① and type in [ARMOURY CRATE]②,and then click [Open]③ to launch Armoury Crate.
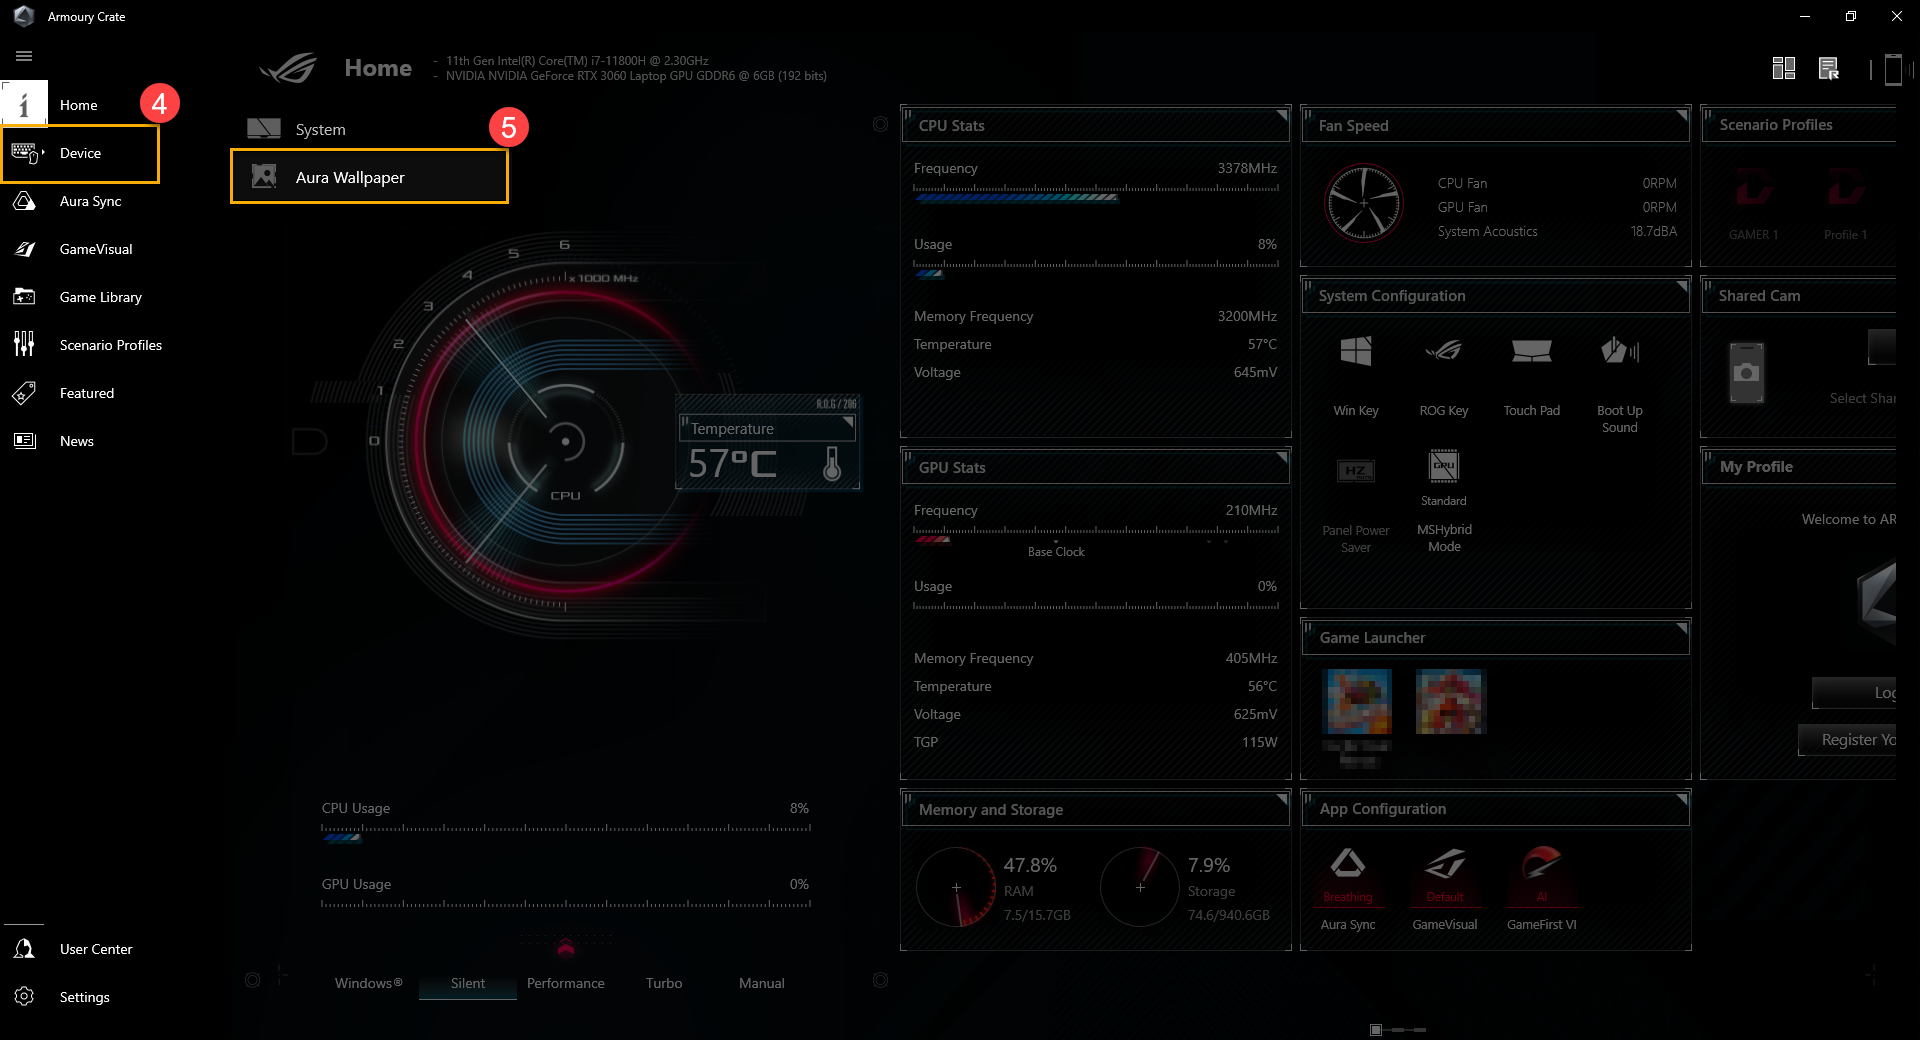
In ARMOURY CRATE home page, clicking [Device]④ and then select [Aura Wallpaper]⑤ to get into setup.
Back to Contents
Aura Wallpaper Setup
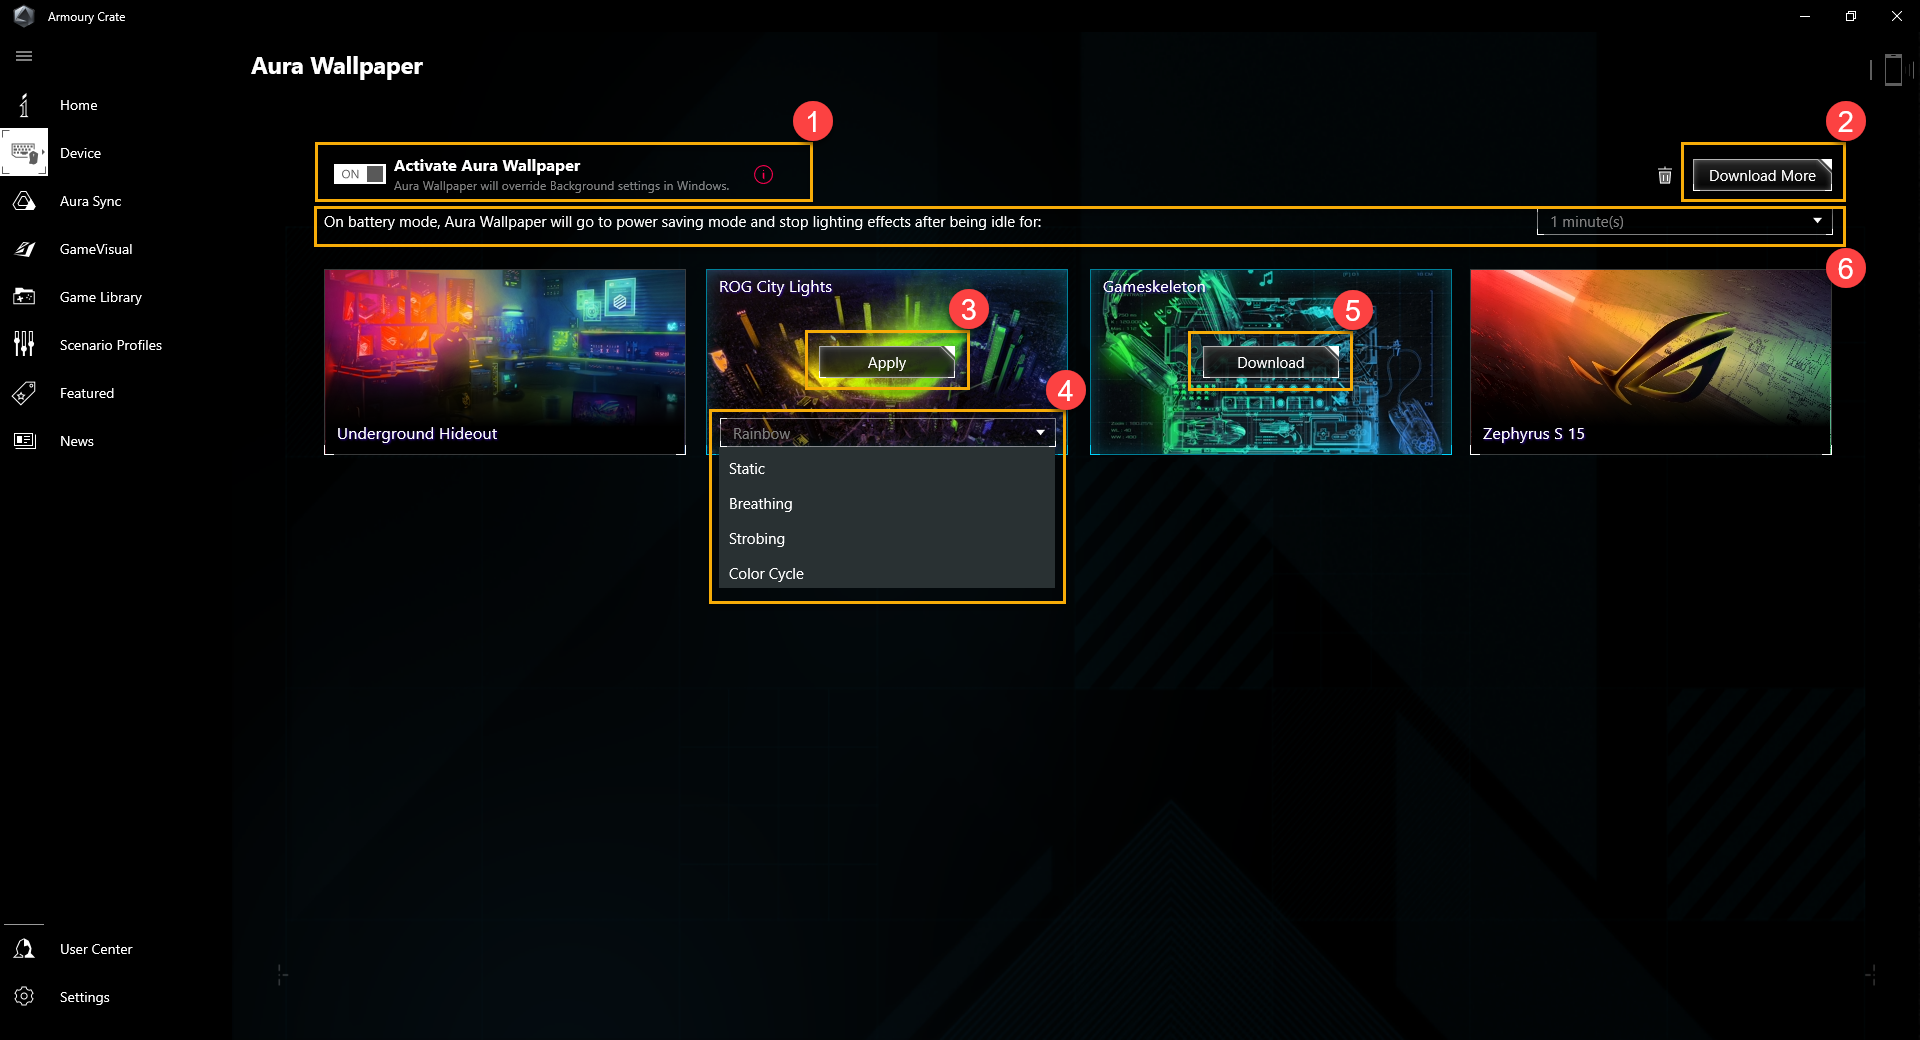
① Activate Aura Wallpaper: Aura wallpaper will override default Windows background setting.
② Download More: Gamers will be directed to [Content Platform] for more Aura Wallpaper.
③ Apply: To apply this Aura Wallpaper.
④ Lighting Effects: Selecting the lighting effects your preferred.
⑤ Download: To download this Aura Wallpaper.
⑥ Power Saving Mode: On battery mode, Aura Wallpaper will stop lighting effects after being idle for.
Back to Contents
Aura Wallpaper System Tray Setup
Once launch Aura Wallpaper, gamers can also click Windows system tray and then select Aura Wallpaper icon  to setup.
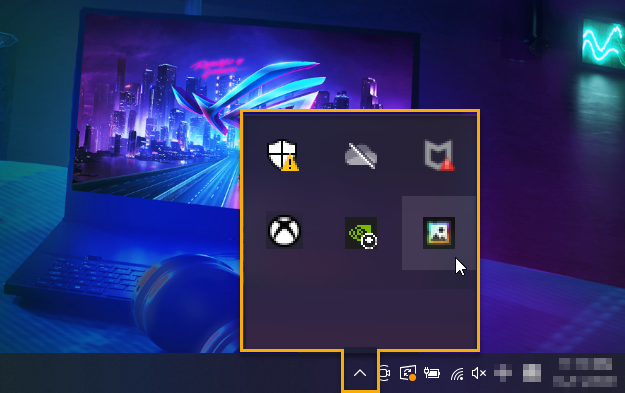
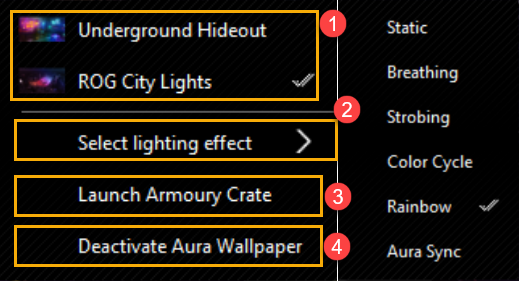
① Apply Aura Wallpaper: To select the Aura Wallpaper.
② Select Lighting Effect: To select the Aura Wallpaper lighting effect.
③ Launch Armoury Crate: Launch Armoury Crate application.
④ Deactivate Aura Wallpaper: Deactivate Aura Wallpaper, and the background will return to default setting.
Back to Contents
Aura SYNC Setup
Aura Wallpaper can also synchronize with laptop Aura light effects thru Aura SYNC, and setup Aura basic lighting effects.
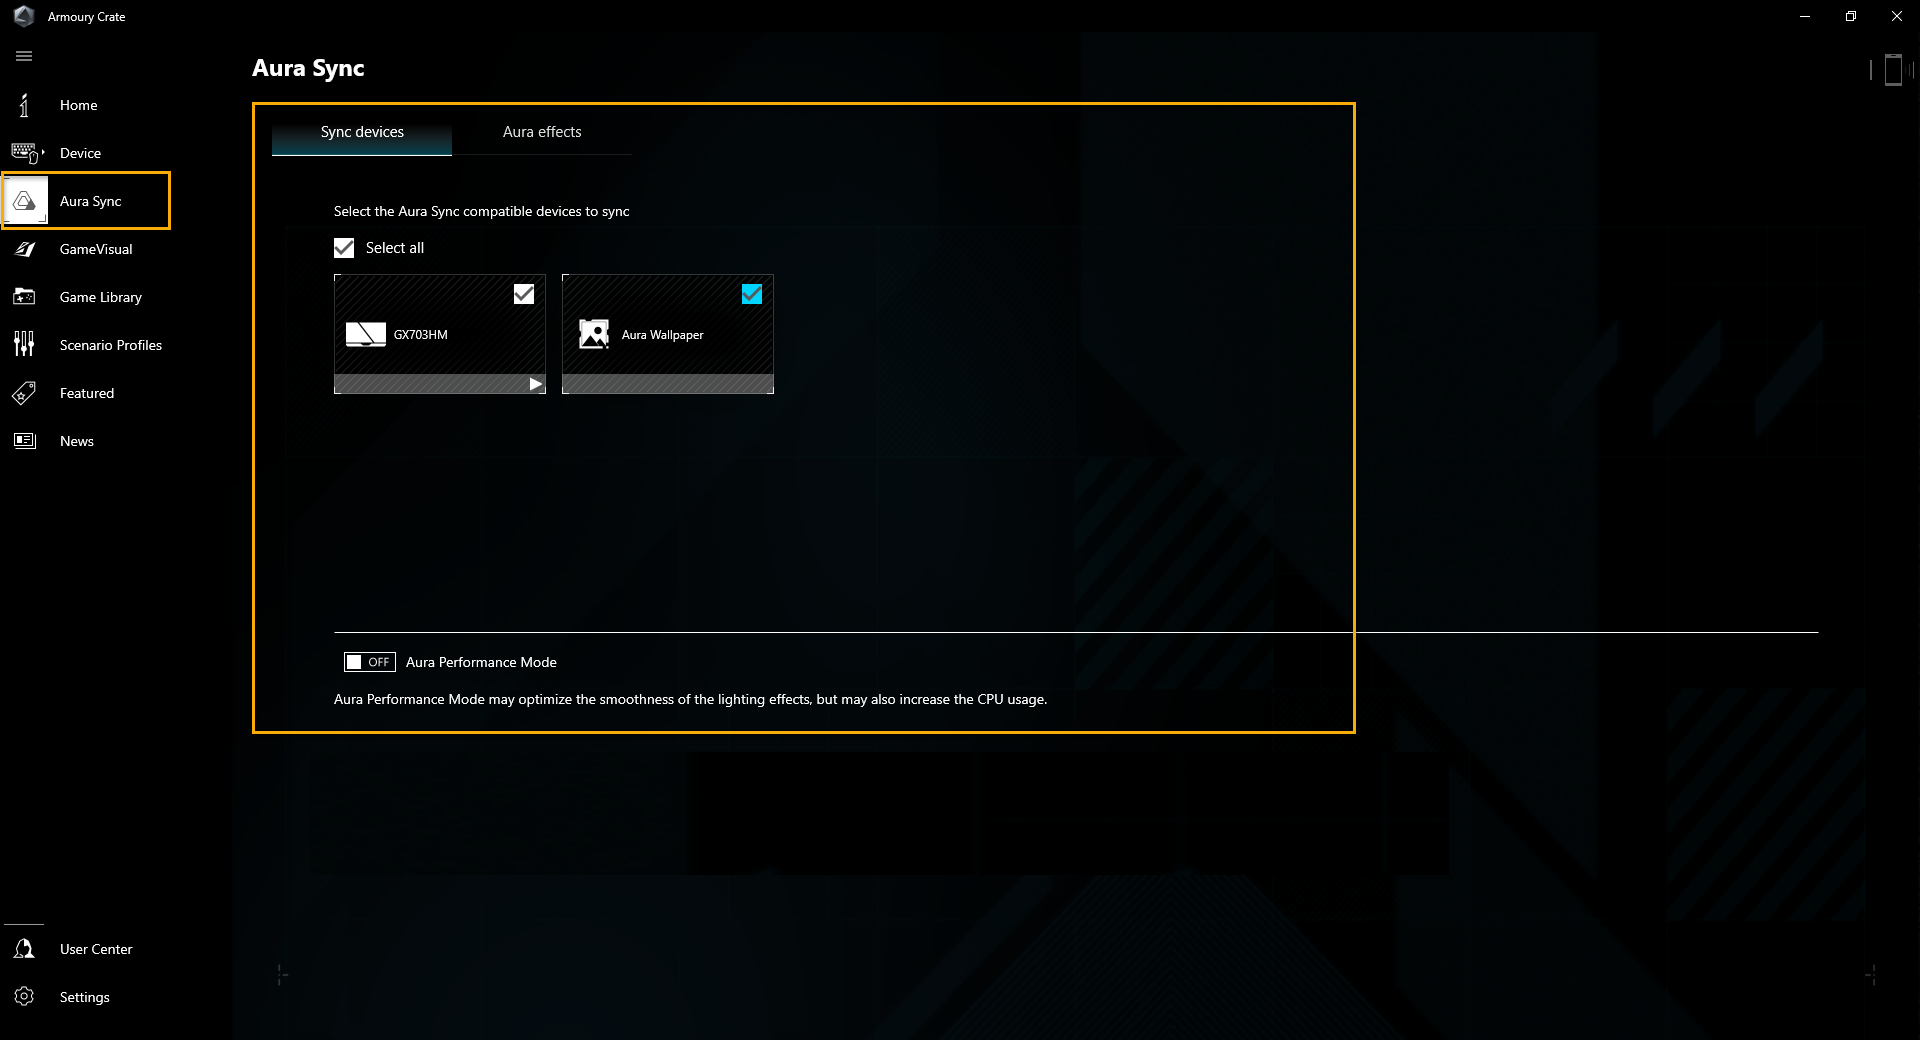
*For more details about Aura SYNC, please refer to [Armoury Crate introduction]
Back to Contents
Content Platform
Through content platform, gamers can download more exclusive Gaming series products Aura wallpaper.
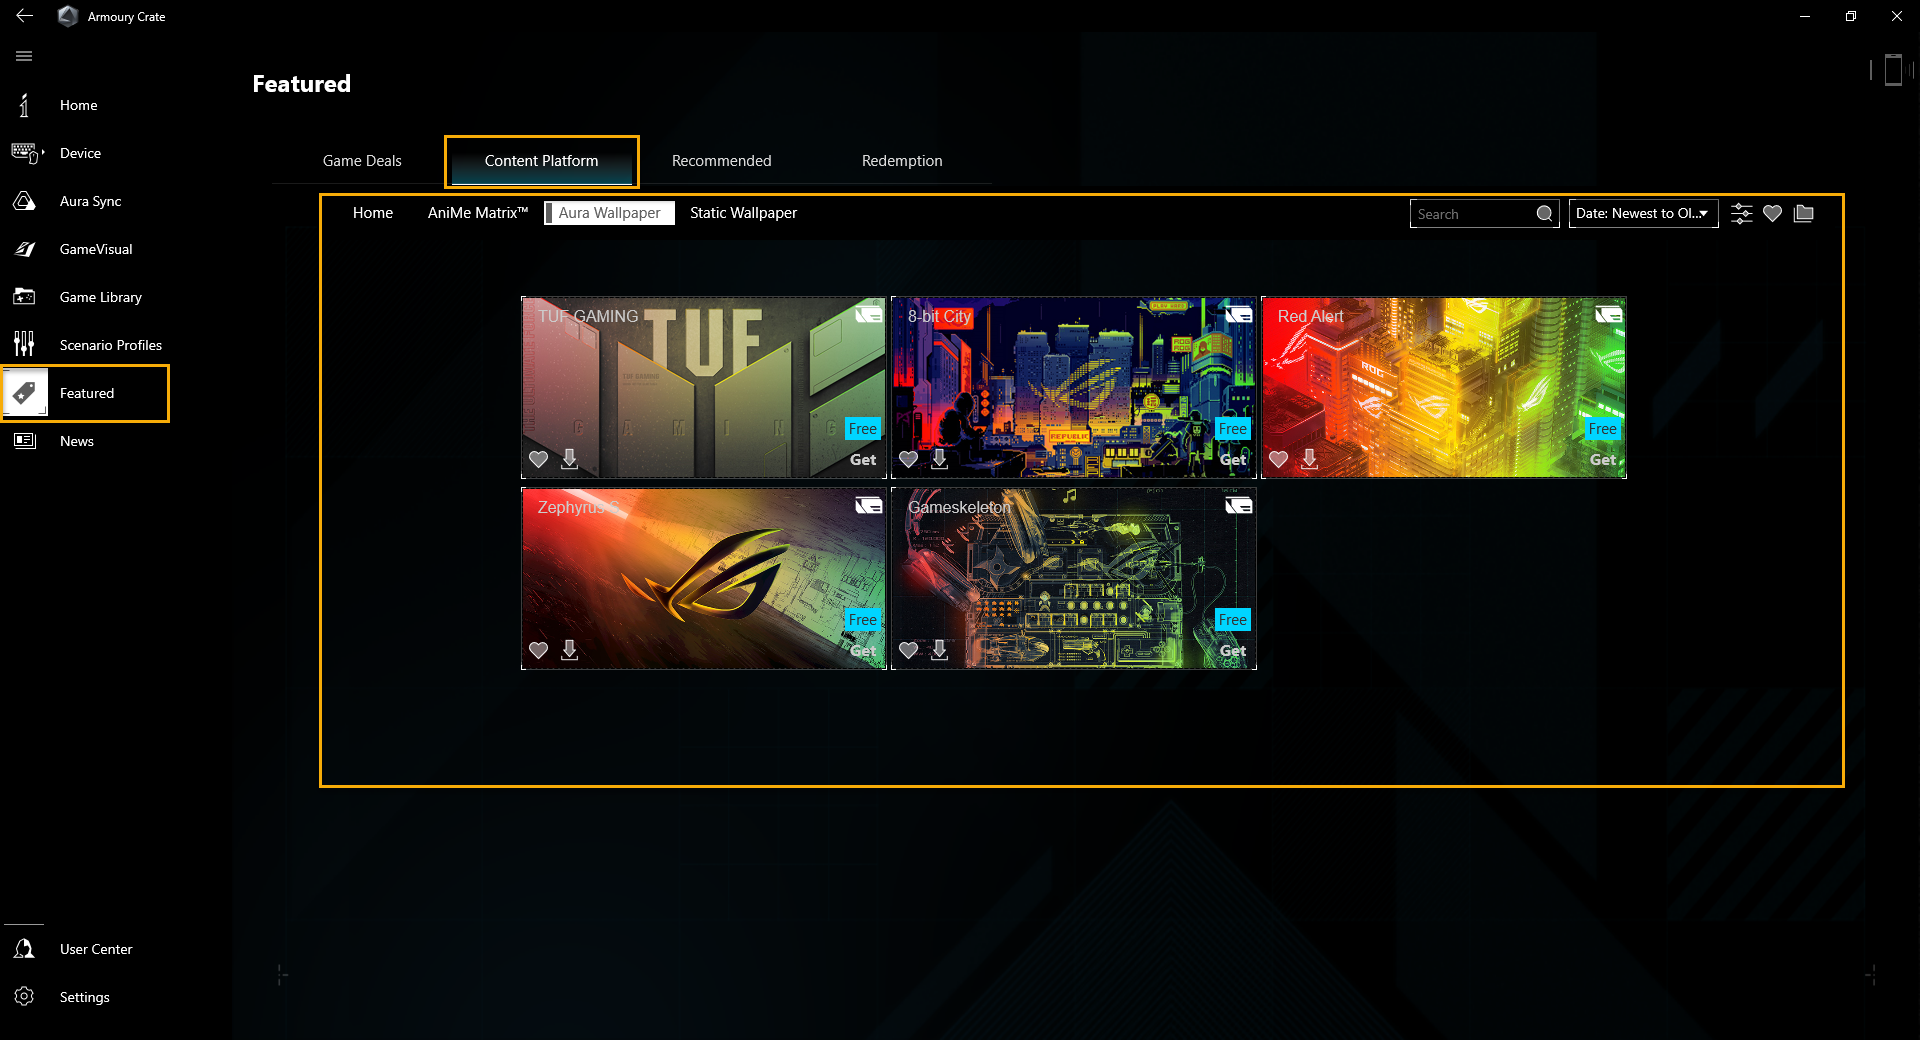
Back to Contents
Q&A
Q1: Why my laptop GPU utilization is getting higher after Aura Wallpaper activate?
A1: We suggest checking Windows Task Manager with GPU Power usage, then you can see that the actual Aura Wallpaper does not affect the overall performance and power consumption. Once Aura Wallpaper activated, it will occupy some GPU resource, so the GPU utilization goes up, but due to Task Manager usually doesn't count all GPU Power Usage and GPU Clock rate, so the GPU utilization looks may higher than actual.

Q2: Can I edit Aura Wallpaper lighting effects through Aura Creator?
A2: For now, each Aura Wallpaper has exclusive lighting effect and feature already, so there is not yet to provide for customizing lighting effects through Aura Creator.
Back to Contents
AURA Wallpaper Creator
Table of Contents
Aura Wallpaper Creator introduction
Model Supported
System Prerequisites
Application Install& Uninstall
Launch AURA Wallpaper Creator
Main Features
Q&A
AURA Wallpaper Creator introduction
Aura Wallpaper Creator is an extension application of Aura Wallpaper. It is an editing application that integrate with ROG Aura lighting effect and Aura Wallpaper. It also provides various editing tool and allow user to select their wallpaper to create a highly-customized Aura Wallpaper lighting effects.
Model Supported
Supports ROG and TUF series Gaming laptop and desktop, and require Windows 10 and above operating system version.
System Prerequisites
The Aura Wallpaper Creator has been integrated into the Armoury Crate application. Users need to configure the Aura Wallpaper Creator settings through the Armoury Crate application.
Supported Version: Armoury Crate application version must be higher than V5.4.0 above.
*Please refer to Link for more details about Armoury Crate Introduction.
Application Install& Uninstall
How to get AURA Wallpaper Creator,please refer to [Aura Wallpaper Creator FAQ].
How to uninstall AURA Wallpaper Creator,please refer to Link.
Launch AURA Wallpaper Creator
Please refer to [Aura Wallpaper Introduction] to launch Aura Wallpaper application, and then click [Design Wallpaper] to launch Aura Wallpaper Creator.
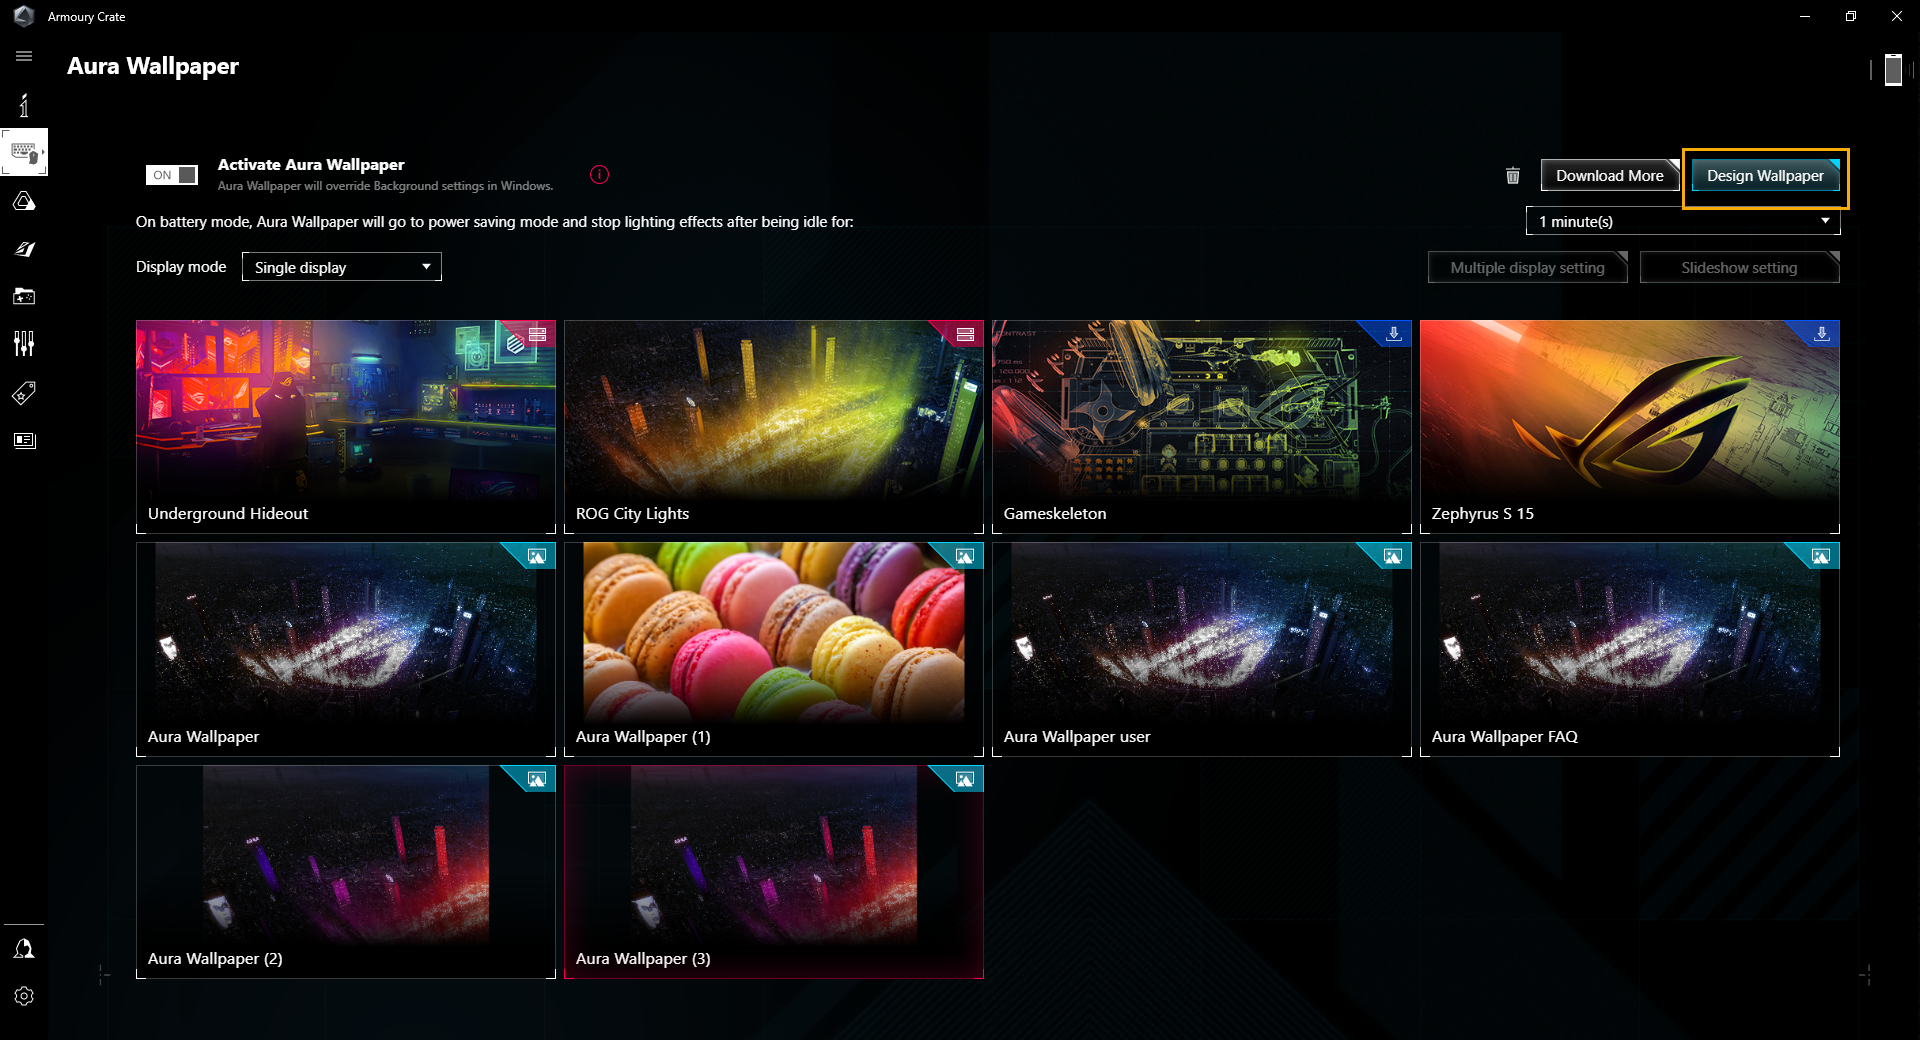
Main Feature
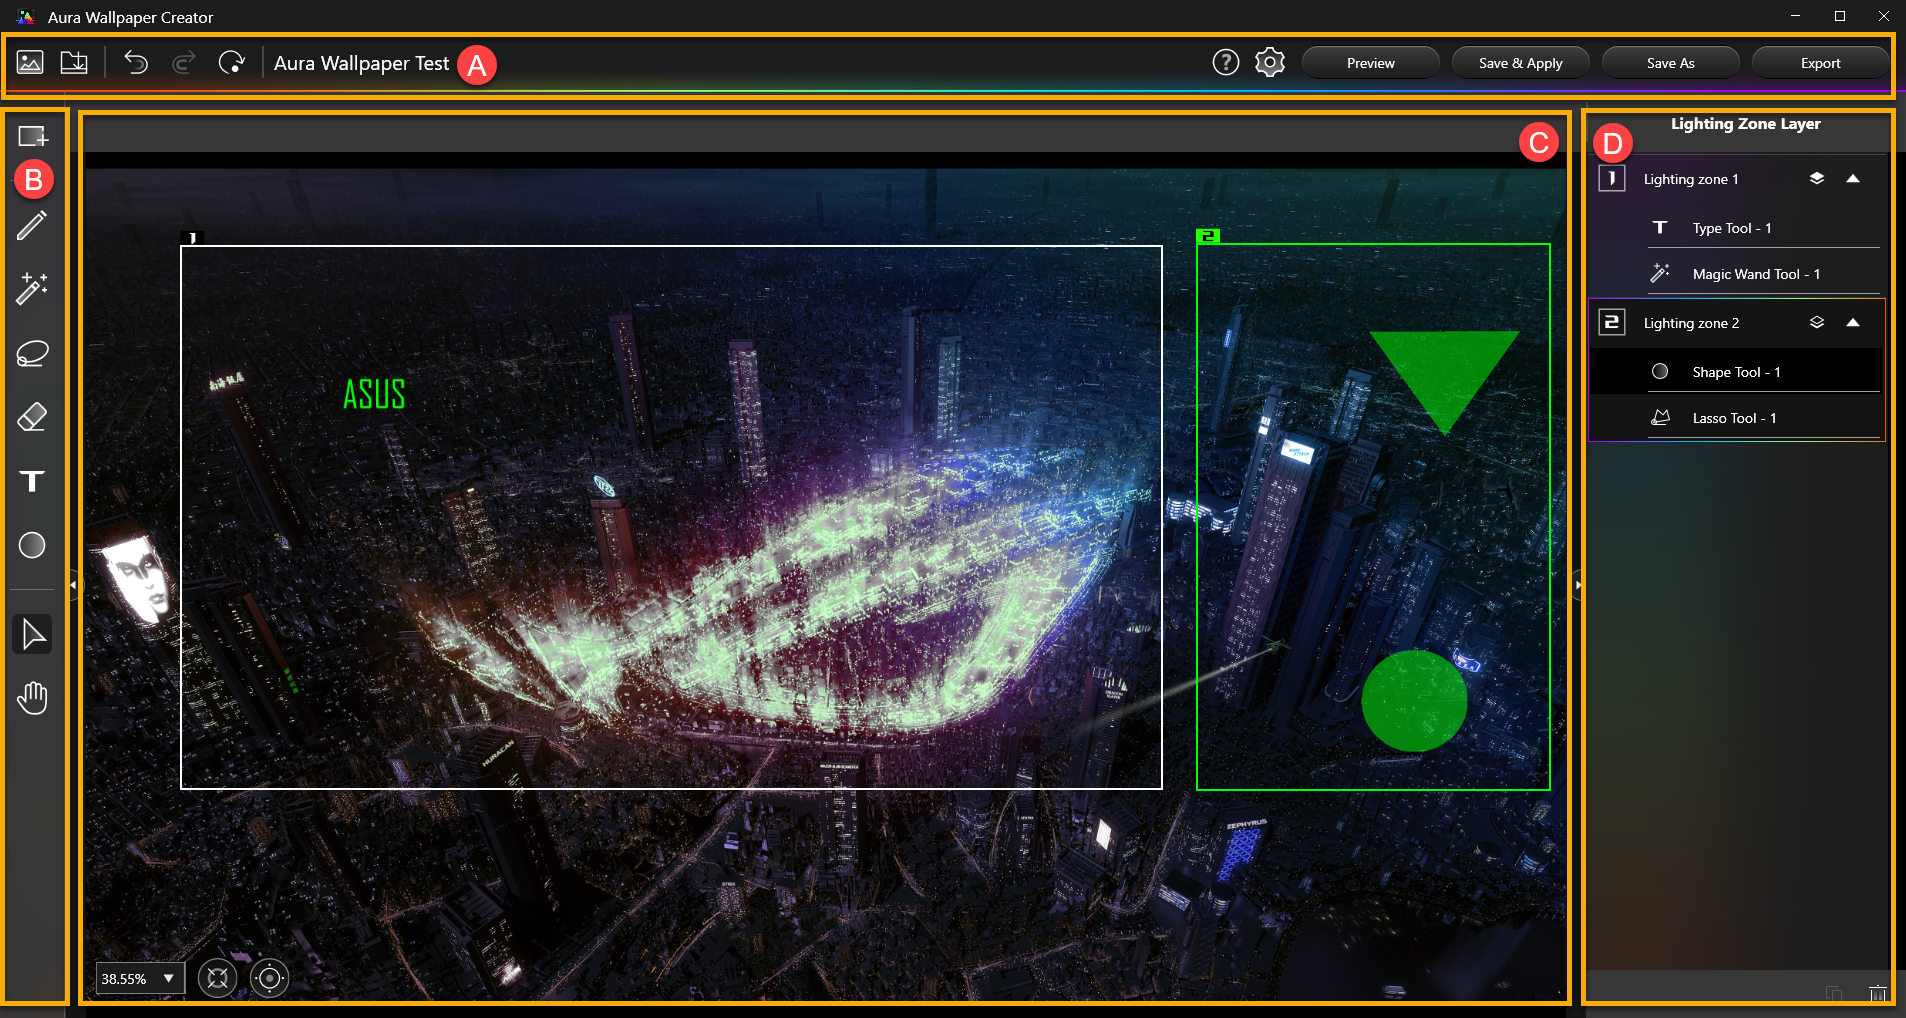
AURA Wallpaper Creator Homepage
A System Management
B Lighting Zone Editing Tools
C Lighting Zone Editing Area
D Lighting Zone and Layer Management
Back to Contents
A System Management
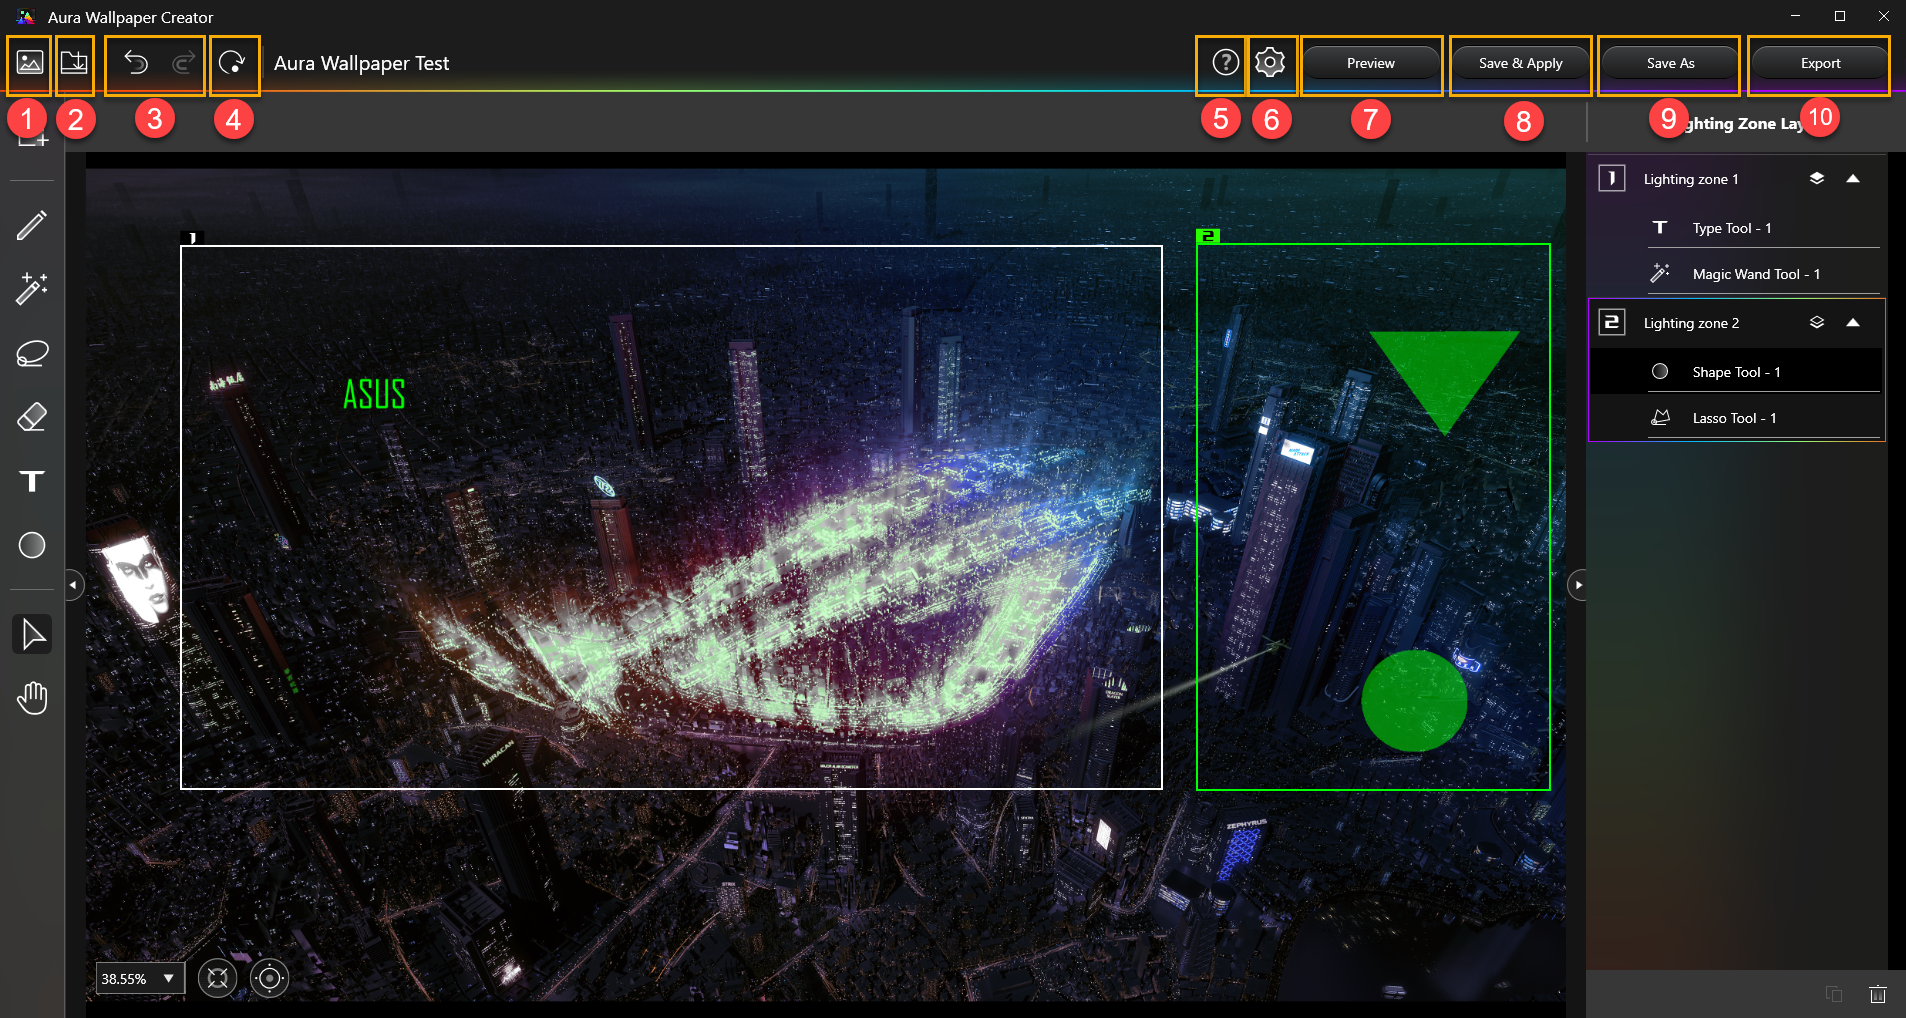
①Open Image: User can import their own image files. (Support .png .jpg .gif .bmp format)
②Import: To Import a Aura Wallpaper format file.
③Undo/Redo: Click to restore the last or next action of the editing operation.
④Clear All: To clear all changed lighting zones and layers in the editing area.
⑤Help: Provide more information about AURA Wallpaper Creator's feature highlights、quick tips and shortcut keys.
⑥Settings: Provide information about AURA Wallpaper Creator edition.
⑦Preview: Preview the lighting effects for edited lighting zone and layer currently.
⑧Save & Apply: Save the currently edited file and apply it directly.
⑨Save As: Save the currently edited file into a new file.
⑩Export: Export and save the currently edited file.
B Lighting Zone Edit Tools
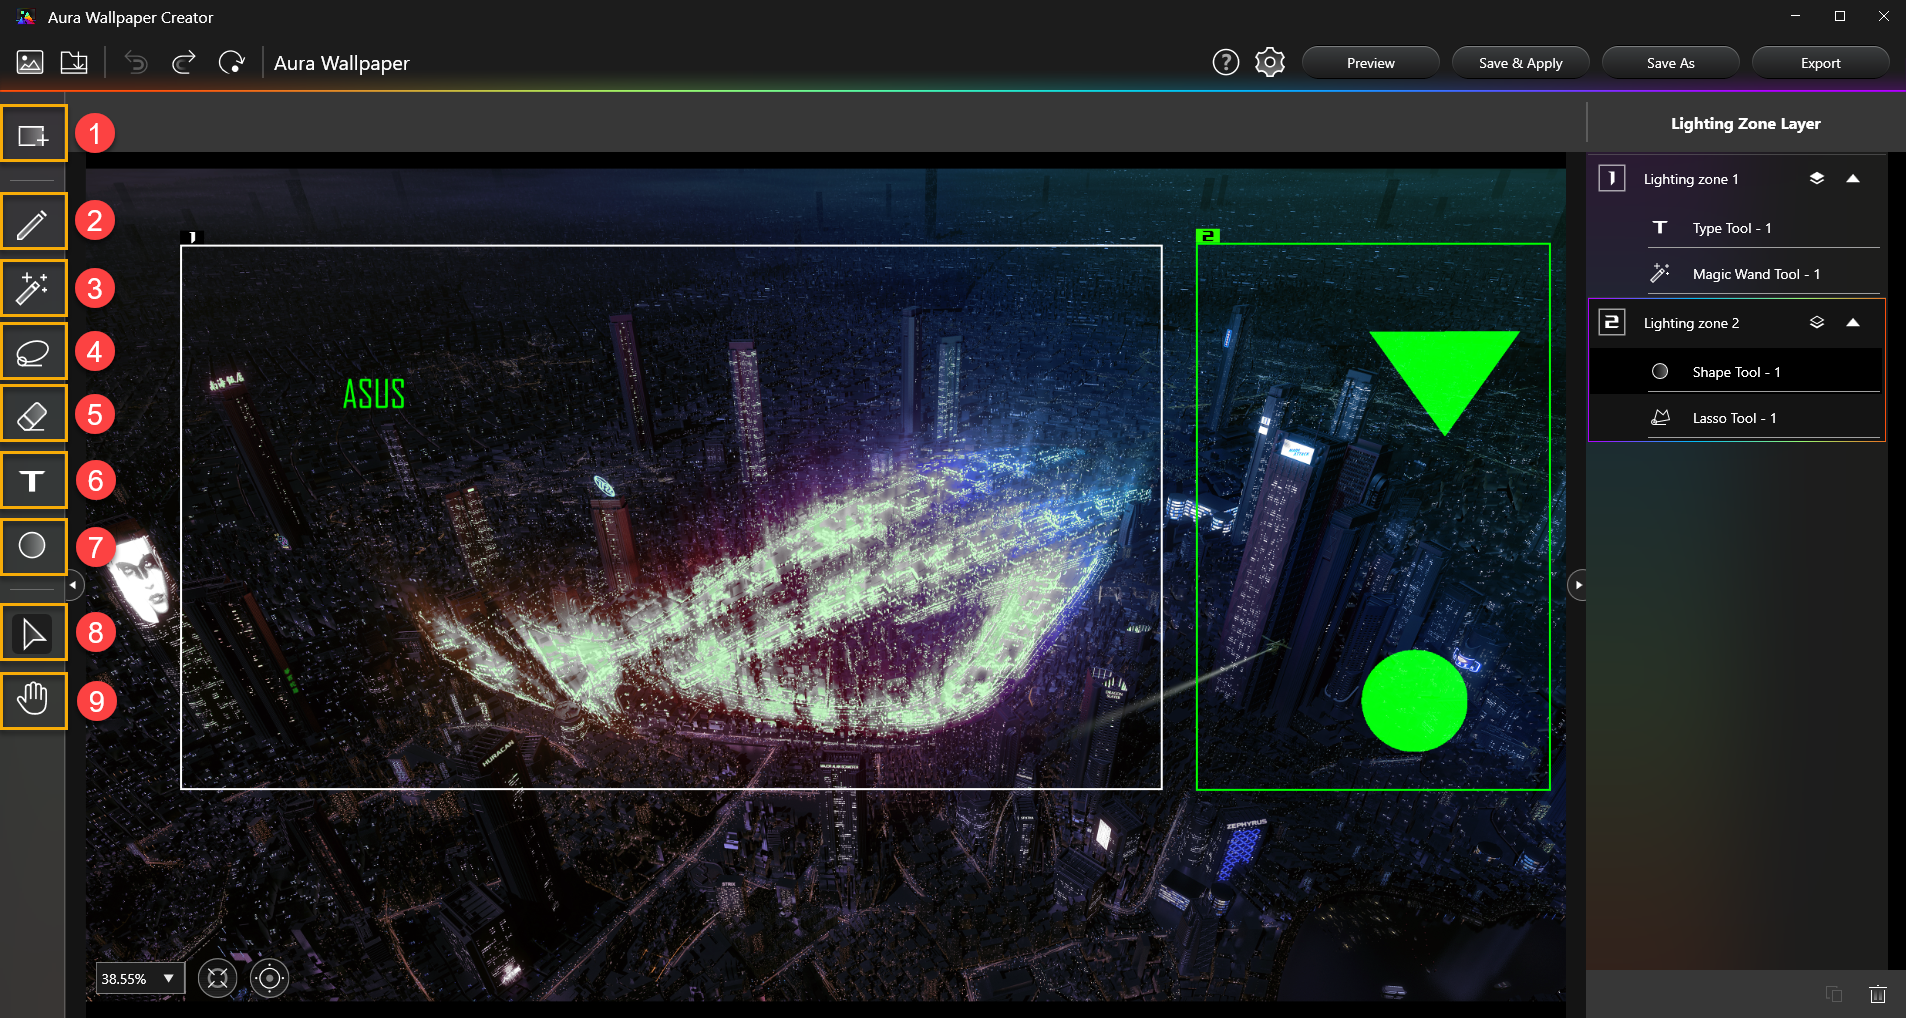
①Create New Lighting Zone: To create a new lighting zone, users can select any range in the editing area to create a light area.
②Brush Tool: Using Brush Tool to draw in selected lighting zone.
③Magic Wand Tool: Select an area with the same color gamut within a lighting zone to create a layer lighting effect.
④Lasso Tool: Using Lasso Tool to draw a graphic or polygonal lighting effect in a selected lighting zone.
⑤Eraser Tool: Using Eraser Tool to erase the selected lighting zone content.
⑥Type Tool: Insert text as a lighting effect layer.
⑦Shape Tool: Provides a variety of basic graphics for user to apply.
⑧Object Selection Tool: Using Object Selection Tool to move and adjust layer object within selected lighting zone.
⑨Background Repositioning Tool: Using Background Repositioning Tool to move background image.
C Lighting Zone Edit Area
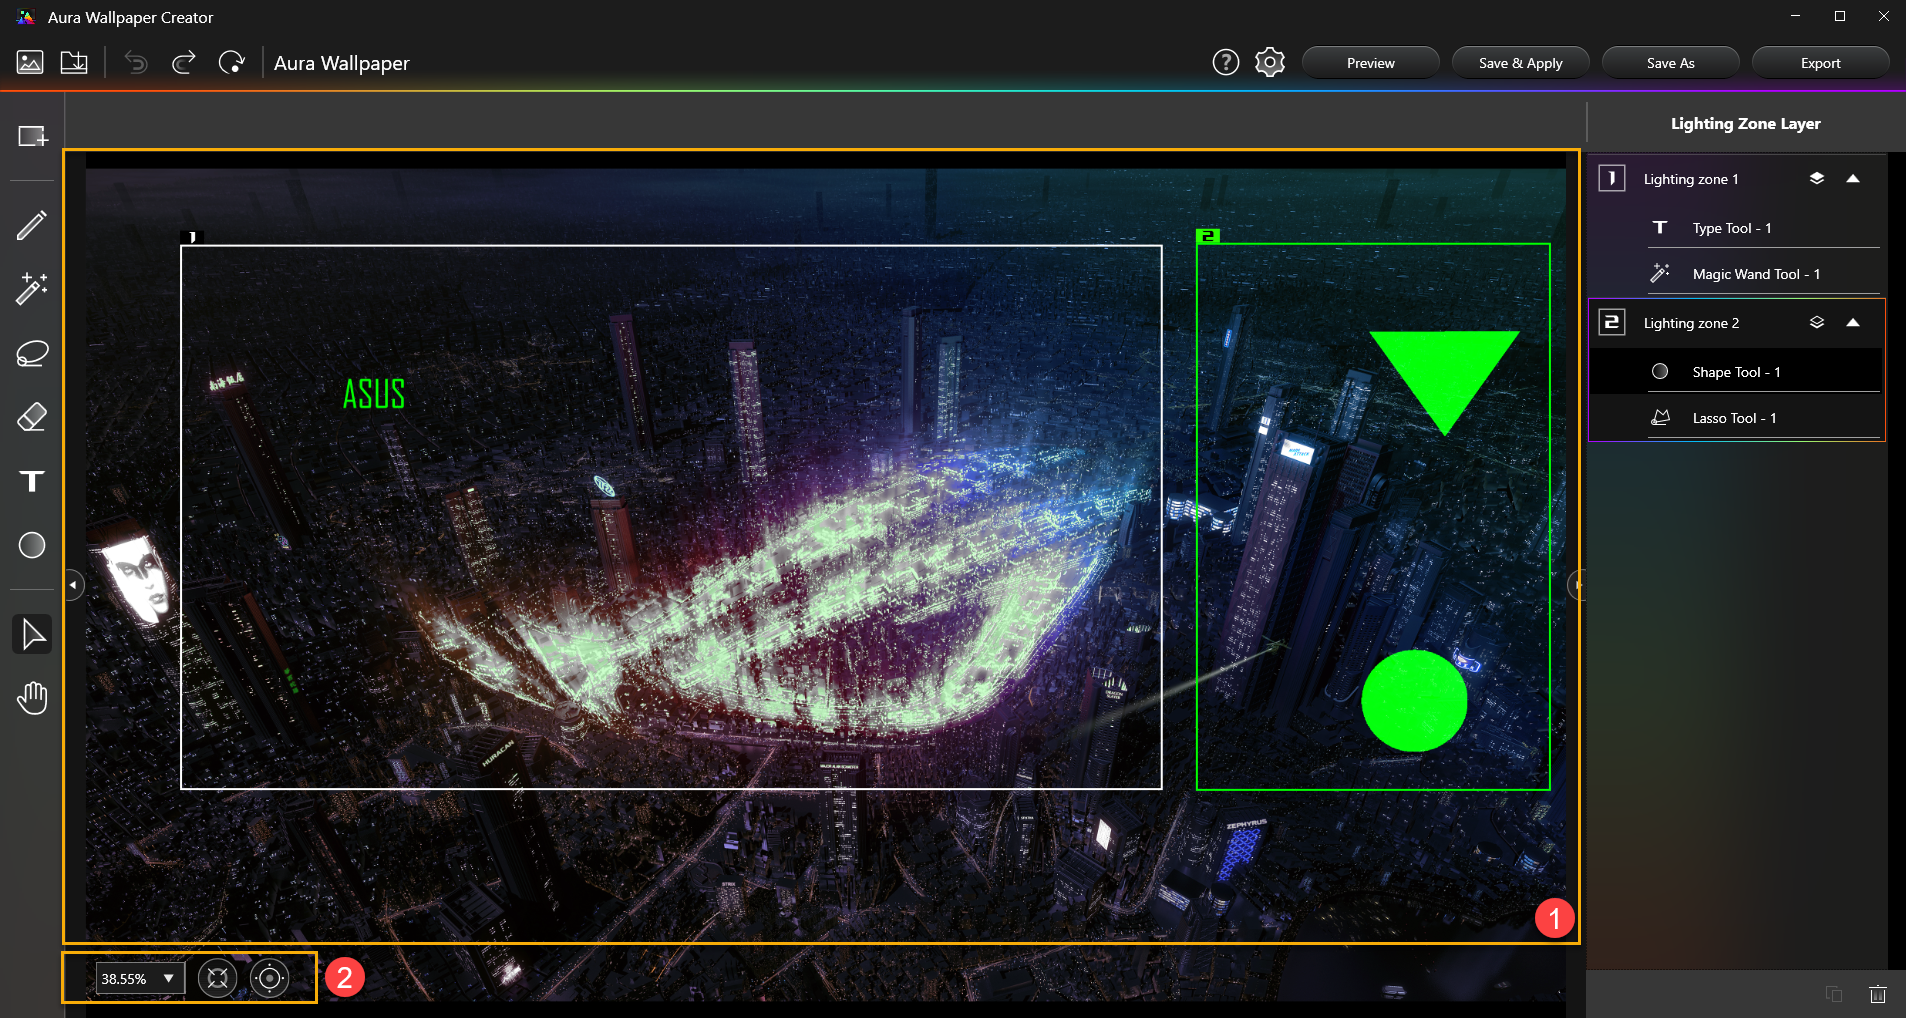
①Edit Area: To create and edit the area range of the lighting area or layer.
②Edit layout management: To adjust the edit area for zoom-in or zoom-out.
D Lighting Zone and Layer Management
All created lighting zone and layers will be listed here.
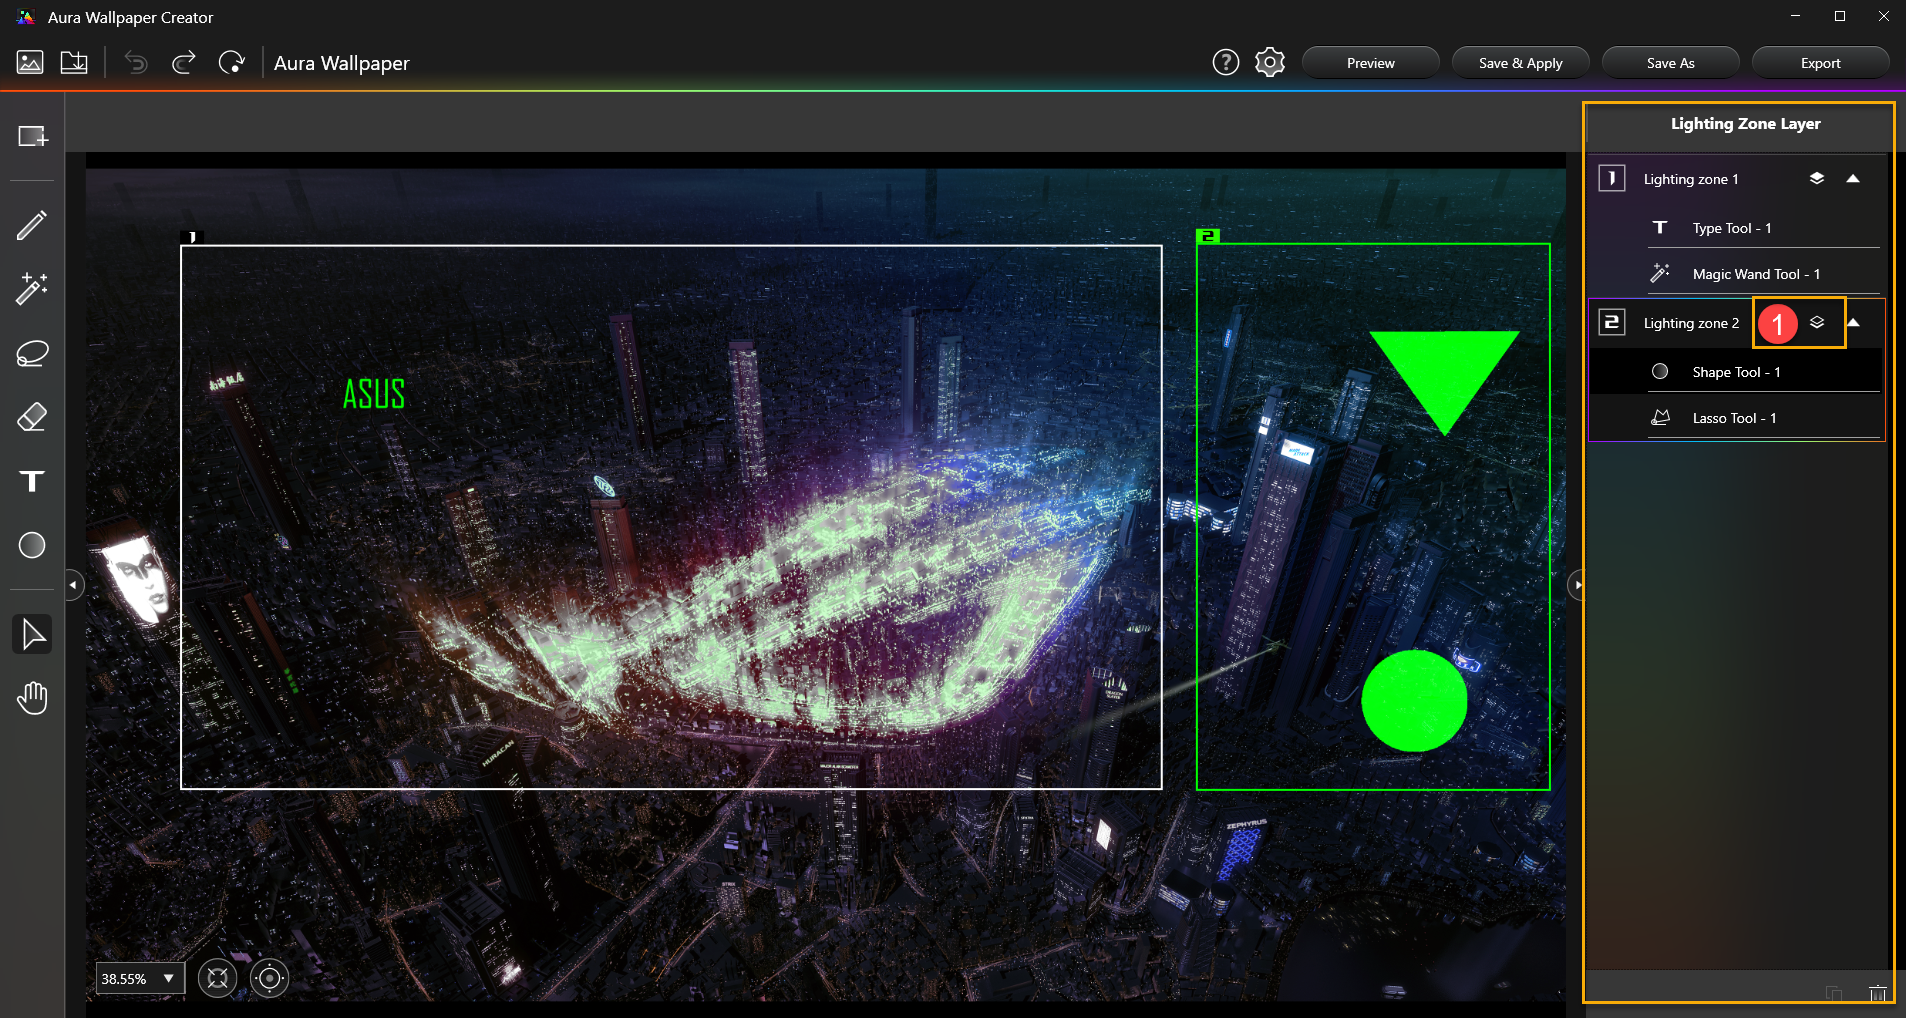
①Layer locked: Unlock object layers for editing. Then you can copy, delete, and rename the layers.
Back to Contents
Q&A
Q1: Why I can not re-edit text content of type tool effect?
A1: Once text lighting effect created, it will be unable to re-edit text content. If require modifying text content, please create a new text lighting effect.
Back to Contents


 "Play"


 to setup.


