[Motherboard] Troubleshooting - Cannot find the hard disk drive or SSD(M.2) after motherboard powers on

Update : 2024/09/06 10:20

[Motherboard] Troubleshooting - Cannot find the hard disk drive or SSD(M.2) after motherboard powers on

To provide you more detailed instruction, you can also click ASUS Youtube video link below to know more about cannot find the hard disk drive or SSD(M.2) after motherboard powers on

https://www.youtube.com/watch?v=Xj-wPw2TZVI


If the computer can't detect and find hard disk or SSD after the power is turned on, please follow the steps below to troubleshoot:


A. Confirm the settings in BIOS

1.  Please try to update the latest version BIOS from ASUS official website. Please refer to this FAQ for more : [Motherboard] ASUS EZ Flash 3 - Introduction

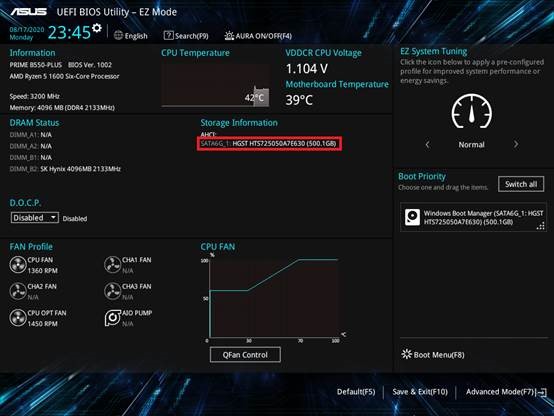
2.  After the computer powers on, please immediately press 'delete' key on the keyboard to enter EZ Mode. Please confirm the information of the connected hard disk or SSD in Storage Information (Ex: PRIME B550-PLUS)

(If the computer enters BIOS Advance Mode after you press 'delete', you can press 'F7' again to enter EZ Mode)

Note:For the old models (ex: TUF B450-PLUS GAMING) ,which use PCIE Mode M.2 SSD(including: NVME M.2), information of hard disk or SSD doesn't show in Storage Information in BIOS EZ Mode due to the framework of the BIOS. This phenomenon is normal, please be noted.

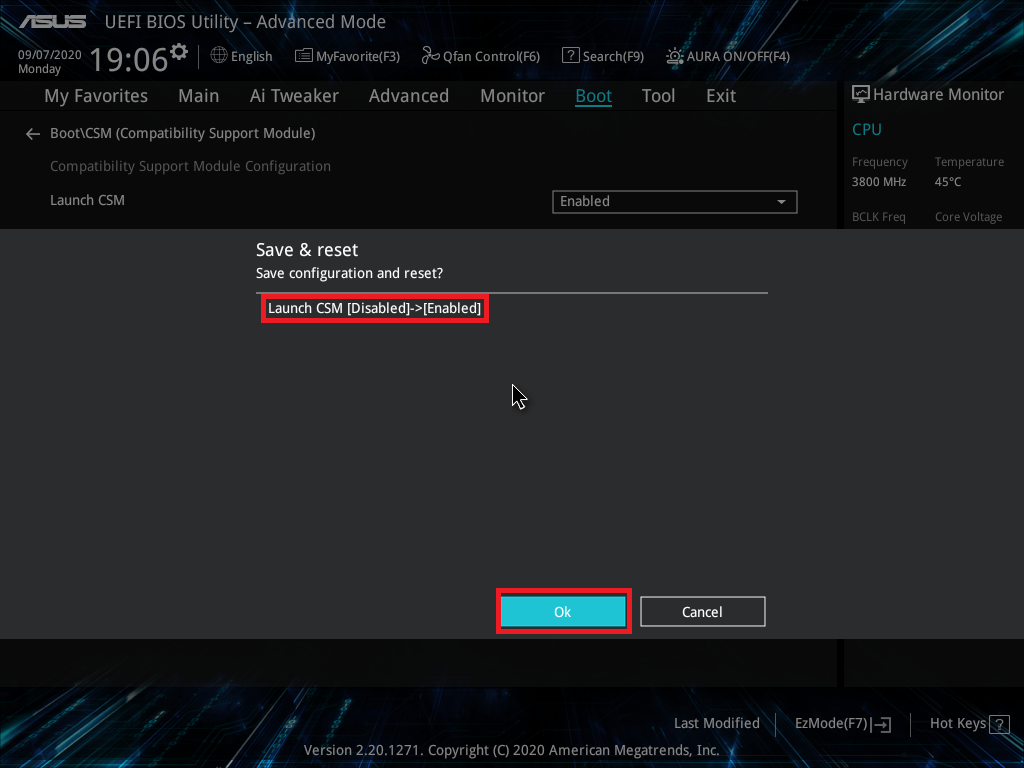
3.  Please enable [CSM] in BIOS

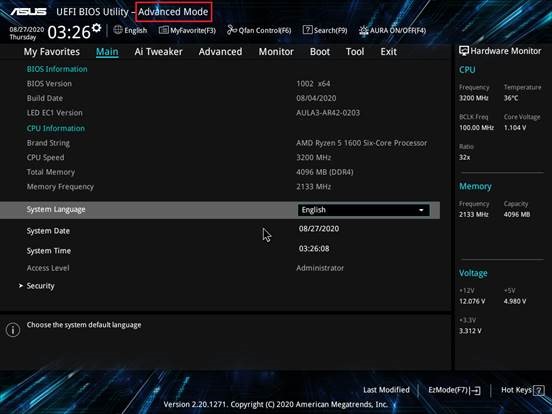
a. After the computer powers on, please press 'delete' to enter EZ Mode, and then press 'F7' to enter Advanced Mode as below:

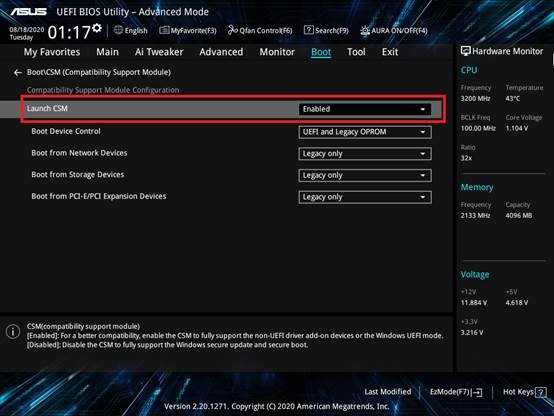
b. Click [Boot] - [Launch CSM]. Please set [Launch CSM] as [Enabled] as below:

c.  Press 'F10' to save the BIOS setting, and click [OK] to reboot. Confirm whether the computer can recognize the hard disk or SSD

4.  If you have set CPU overclocking or Memory overclocking, the computer may not detect the hard disk or SSD due to overclocking instability. Please set BIOS to the default setting by the below steps:

a.  After the computer powers on, please immediately press 'delete' key on the keyboard to enter EZ Mode (you can refer to the picture in step 2)

b.  Press 'F5' to set the BIOS to default setting, then press 'F10' to save BIOS setting and click [OK] to reboot. Confirm whether the computer can detect the hard disk or SSD.


5. If the computer still can't detect the hard disk or SSD after you followed the above step 1~4, please confirm the hardware by below steps


B.  Confirm the hardware

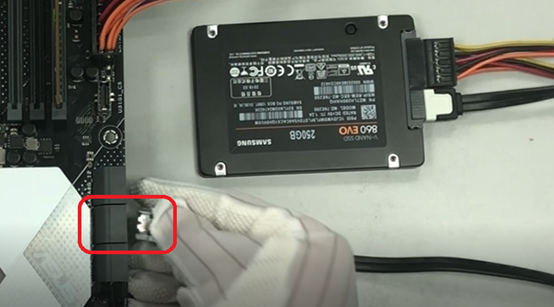
1.  Please try to replug Sata cable on the motherboard, and confirm Sata cable is correctly connected.

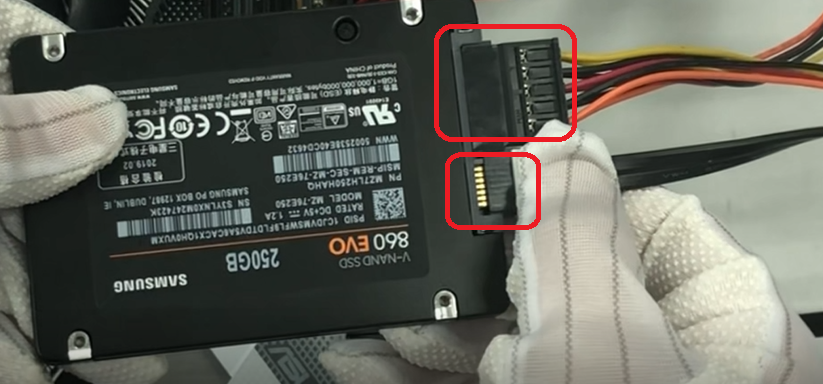
2.  Please try to replug Sata cable or power cable on the hard disk or SSD. Confirm Sata cable or power cable is correctly connected

3.  Please try another SATA port of the power supply

4.  Please replace with a good Sata cable without problem

5.  Please try to connect hard disk or SSD to anther Sata port of the motherboard

6.  Please replace with another power supply, and confirm whether the Sata cable of the power supply is abnormal

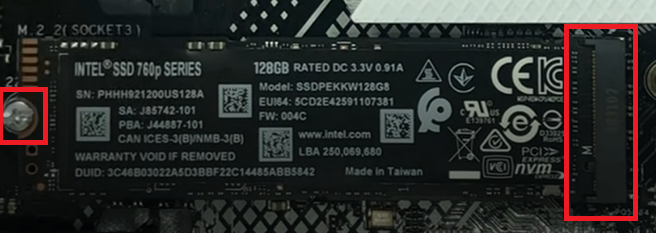
7.  If the connected SSD is M.2 SSD, please try to replug M.2 SSD. Confirm M.2 SSD is correctly connected and the M.2 screw is locked, as below:

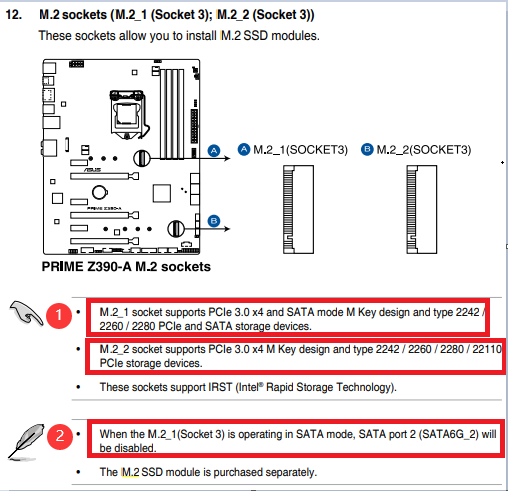
8.  Please check user manual on ASUS Official Website. Confirm whether M.2 port supports , and confirm whether it is shared with other port

①  M.2_1 port can support SATA mode and PCIE mode

     M.2_2 port can only support PCIE mode and can't support SATA mode. Therefore, if you connect SATA mode M.2 SSD to M.2_2 port, the computer can't recognize.

②  M.2_1 port is shared with SATA6G_1 port. Therefore ,when connecting the device to the two ports, SATA6G_1 port will be closed.

At this time, the computer can only recognize M.2 SSD in M.2_1 port, and it can't recognize the hard disk in SATA6G_1.  If you need computer to recognize the hard disk in SATA6G_1,please connect Sata cable of SATA6G_1 port to other Sata port, such as SATA6G_3 or SATA6G_4

9.  If you still can't solve your problem with the above steps, the hard disk may have the physical damage or the SSD is damaged. Please try to replace with a properly working hard disk or SSD.


If the problem still cannot be fixed, please contact ASUS Porduct Support.


Notice

Above information might be partly or entirely quoted from exterior websites or sources. please refer to the information based on the source that we noted. Please directly contact or inquire the sources if there is any further question and note that ASUS is neither relevant nor responsible for its content/service.
This information may not suitable for all the products from the same category/series. Some of the screen shots and operations could be different from the software versions.
ASUS provides the above information for reference only. If you have any questions about the content, please contact the above product vendor directly. Please note that ASUS is not responsible for the content or service provided by the above product vendor.